解决Ubuntu16.04 Python3.5 安装 imgaug,matplotlib,scikit-image包失败的问题 | Solve the problem that imgaug, matplotlib, scikit-image packages cannot be installed with Ubuntu16.04 Python3.5

今天尝试在机器上安装imgaug包来进行数据增强,但是发现因为依赖版本问题无法安装,解决方法如下(Ubuntu 16.04, Python 3.5)

首先,确认自己已经编译安装了Opencv3.5或以上版本,然后运行下面的命令即可

pip3 install matplotlib==2.2.5
pip3 install numpy scipy Pillow imageio PyWavelets
pip3 install --no-dependencies scikit-image==0.15.0
pip3 install six
pip3 install --no-dependencies imgaug

现在,你可以尝试在Python中使用imgaug了


Today, I tried to install the imgaug package on my computer for data augmentation, but this pakcage cannot be installed because of dependencies. The solution is as follows (Ubuntu 16.04, Python 3.5)

First, make sure you have compiled and installed Opencv3.5 or above, and then run the following command.

pip3 install matplotlib==2.2.5
pip3 install numpy scipy Pillow imageio PyWavelets
pip3 install --no-dependencies scikit-image==0.15.0
pip3 install six
pip3 install --no-dependencies imgaug

Now you can try to import imgaug package in Python

2019年10月英国签证T4学生签证申请

随着英国政府颁布学生签证材料审核材料减免的政策之后,申请学生签证变得非常简单。在申请时仅需提交ATAS证书和护照,就可以成功拿到签证。

总结一下在线申请时填写的问题。有一些问题答案比较容易就略过了

Travel information

Q: Will you be travelling to the UK as part of an organised group? 你是否作为某个组织团体的一部分去英国旅行?

A: No

Q: Will you be travelling to the UK with someone who is not your partner, spouse, or dependant? 您会和不是您的伴侣,配偶或受抚养人的人一起去英国旅行吗?

A: No

Q: Date you plan to arrive in the UK

A: 到达英国的具体日期

Course details

Q: What are your course fees for your first year?

A: 填写第一年学费即可

Q: Have you or your parent(s) or legal guardian(s) already paid any of your course fees?

A: 这里如果你已经提前付了学费,比如押金,就选择是并填写金额;如果没有付任何款就选No

Q: Have you or your parent(s)/legal guardian(s) already paid any money to your sponsor for accommodation?

A: 这里如果你已经提前付了住宿费,比如押金,就选择是并填写金额;如果没有付任何款就选No


Q: Name of sponsor institution (school/college/university)

A: 填写学校的名字

Q: Are they going to be a student union sabbatical officer?

A: No

Q: Qualification you will get

A: 这里填写你毕业时获得的证书等级。在CAS上会有明确标注。有的时候不一定能找到完全对应的选项,比如Leeds给我的CAS上写的等级是QCF_NQF8,而列表里并没有这个选项。这时候可以查询学校官方的签证指导说明。Leeds给出的解释是NQF就是RQF等级。所以我这里选择RQF8/SCQF12

Q: Course name

A: 填课程的名字即可


Q: Course start date

A: 课程开始日期

Q: Course end date

A: 课程结束日期

Q: Will you be studying at a school or higher education institution?

A: Higher education institution

ATAS details

Q: Do you need to obtain permission from the ATAS?

A: 这个看你需不需要ATAS证书,CAS上有注明,需要的话一定要提前申请,这个处理时间比较长,一般是20个工作日左右。没有加急

Q: What is your Academic Technology Approval Scheme (ATAS) reference number?

A: 这个在你的ATAS证书上有,注意是Atas reference不是Certificate identifier

Personal information

Q: Do you have a valid national identity card? 有国内身份证,这里填Yes

A: Yes

Q: National identity card number 国内身份证号码

A: Yes

Q: Issuing authority 发证机关

A: XXX公安局一般叫XXX Public Security Bureau


Q: Do you currently hold, or have you ever held, any other nationality or citizenship? 是否拥有过其他国家的公民或国际身份

A: No


Q: How long have you lived at this address?

A:  在这个问题之前会问你在住址。这里是填写你在这个住址多长时间。

Q: What is the ownership status of your home?

A: 如果和父母一起住,这里选Others

Q: Give more details about your living situation, such as who you live with and who owns the property

A: 这里博主是和父母一起住,所以填写It belongs to my parents and I live with them.


Q: Provide your telephone number

A: 这里填写你的手机号就可以,别忘了填写国际区号

Q: Where do you use this telephone number?

A: 填写你上面手机号的使用区域,在中国使用就填For use whilst out of the UK

Passport details

Q: Issuing authority 护照的发证机关

A: MPS Exit & Entry Administration

Do you know where you will be staying in the UK

Q: Do you know where you will be staying in the UK?

A: 这里填写你知不知道去英国要住在哪里,如果不知道写No就好

Accommodation details

Q: Where do you plan to stay in the UK?

A: 这里博主通过学校申请住宿,所以填写的是A student apartment applied through the University of Leeds

Travel history (UK)

Q: Have you applied for leave to remain in the UK in the past 10 years?

A: 如果你在英国申请过居留许可,比如续签或者永居申请,需要填写Yes,否则No

Travel history (other)

这里博主把转机的情况也填写了,选的是Transit (travelling through the country),其他的问题照常写即可。

Sponsor

Q: What is your sponsor licence number?

A: 这个在CAS上有说明,请直接复制

Q: Sponsor’s address

A: 这个有的时候在CAS上没有,到学校官网直接拷贝学校地址即可。如果觉得不靠谱可以考虑搜索学校的签证指导文件。

Q: Did you apply for your course through UCAS?

A: 如果你是通过UCAS申请的,这里就填写Yes


Q: Do you have a Confirmation of Acceptance for Studies (CAS) number?

A: Yes

Q: Confirmation of Acceptance for Studies reference number

A: 这里填你的CAS号码

Q: Are all of the maintenance funds required for this application in a bank account with your name on it?

A: 如果你的保证金存在你的名下,就选Yes,一般都强烈建议存在自己的名下。

English language

Q: Have you successfully completed a course of study in the UK as a Tier 4 (Child) student? 你是否持有过T4儿童签证在英国完成课程?

A: No

Q: Does your Confirmation of Acceptance for Studies (CAS) statement indicate that your English language ability was assessed by your institution or that you are a ‘gifted’ student?

A: Yes

Q: We may have to talk to you about your application. Which language would you prefer to use?

A: English 这个就填English就好,就算使馆给你打电话也是中文
Laravel Union操作后排序错误的问题 Fix the wrong order after using union method in Laravel query

解决方法,在两个子查询中分别加上limit即可。可以使用较大的数确保所有记录返回。

The solution is to use the limit method on the two subqueries. You can use a larger number to ensure that all records are returned.

$orders1 = Order::where('id', '=', $user->id)
    ->where('status', '!=', 0)
    ->orderBy('id', 'asc')
    ->limit(1e8);

$orders2 = Order::where('id', '=', $user->id)
    ->where('status', '=', 0)
    ->orderBy('created_at', 'desc')
    ->limit(1e8)
    ->unionAll($orders1)
    ->get();


Laravel 5.5在浏览器中预览Notification渲染 Previewing Laravel Notification In Browser

对于Mail,我们可以通过下面的代码在浏览器中预览Mailables

For Mail, we can preview Mailables in the browser with the following code.

Route::get('/mailable', function () {
    $invoice = App\Invoice::find(1);
    return new App\Mail\InvoicePaid($invoice);
});

然而Notification类中toMail返回的MailMessage实例,Laravel文档中并没有给出直接方法在浏览器中预览,我们可以采取下面的方法。

However, the MailMessage instance returned by toMail method in the Notification class does not give a direct method to preview in the browser in the Laravel document. We can use the following code.

Route::get('/mailable', function () {
    $message = (new \App\Notifications\FooNotification()->toMail("bar");
    return app()->make(\Illuminate\Mail\Markdown::class)->render($message->markdown, $message->data());
});

在Laravel5.8及以上,MailMessage实现了Renderable接口(PR in Github),所以可以直接return MailMessage实例作为响应了。

In Laravel 5.8 and above, MailMessage implements the Renderable interface (PR in Github), so you can directly return the MailMessage instance as a response.


Intellij编写Kotlin的Hello world并打包成JAR

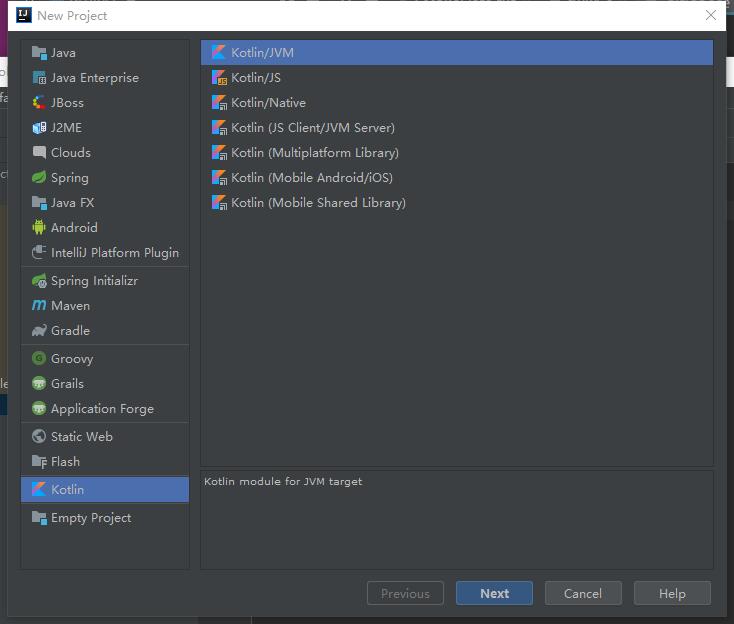
首先,创建Kotlin项目

然后,在src文件夹下新建main.kt,编写Hello world

fun main(args: Array<String>) {
    println("Hello, World!")
}

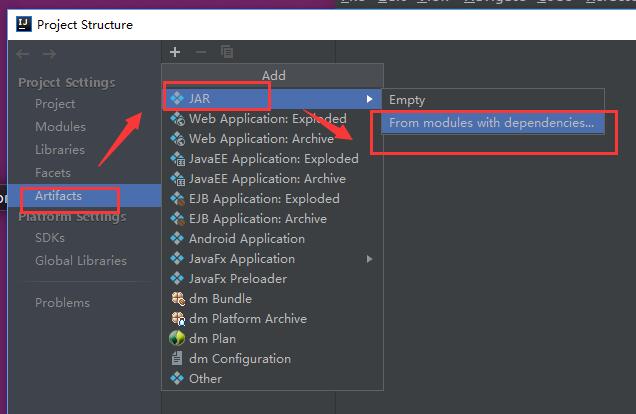
接着,菜单File->Project Structure

添加JAR工件

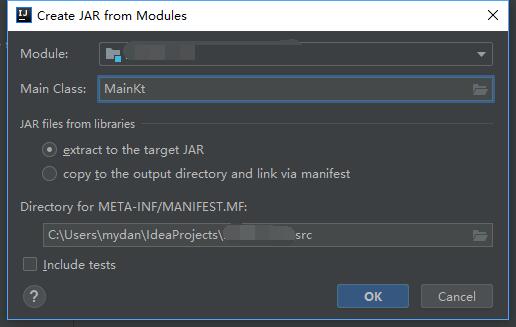
选择主类

最后所有的设置如下图,点击OK,确认和应用即可。

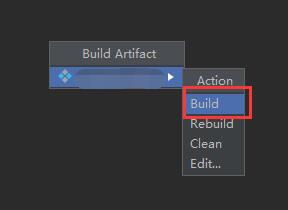
然后我们构建JAR,在弹出的小窗口中选择Build

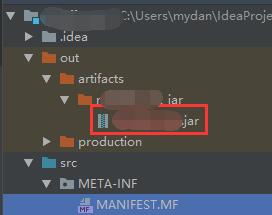
最后,在输出文件夹就可以看到JAR了,可以打开命令行用java -jar xxxx.jar来运行一下。会输出Hello, World!


配合Clion在Ubuntu上安装并使用OpenMPI

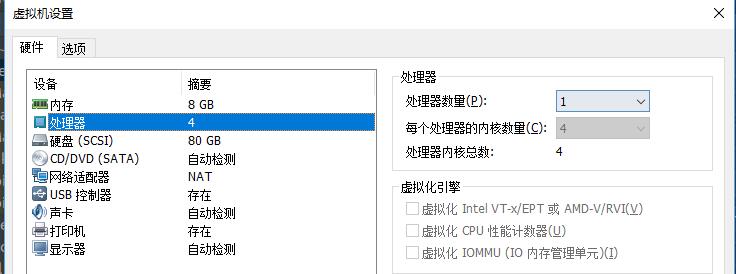
如果你在虚拟机上安装Ubuntu,请确认系统的CPU拥有多个核心,比如下图的4核心

首先,我们在Ubuntu上安装OpenMPI

sudo apt-get update
sudo apt-get install openmpi-bin openmpi-doc libopenmpi-dev

安装完成后,我们到Clion新建一个项目。打开项目的CMakeLists.txt,在任意set下加入下面的参数。

set(CMAKE_C_COMPILER /usr/bin/mpicc)
set(CMAKE_CXX_COMPILER /usr/bin/mpic++)

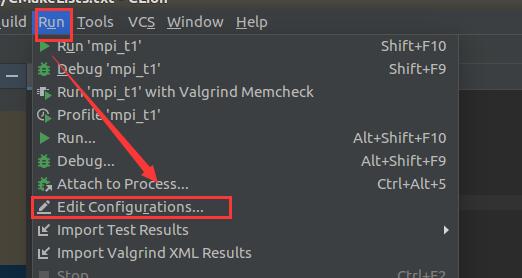
然后,我们打开菜单Run->Edit Configurations

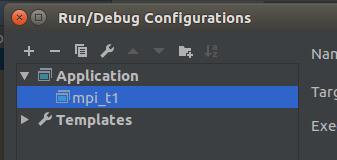
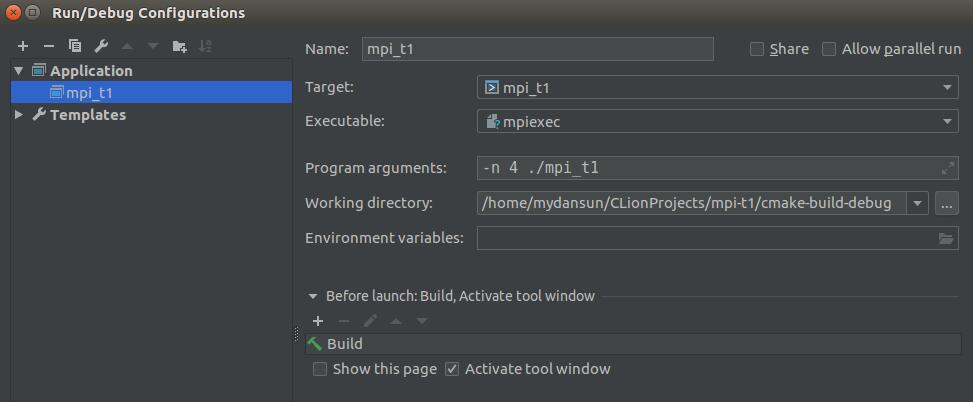
找到当前应用的配置文件(默认应该就是),比如我这里这个项目叫mpi_t1,左边应用就应该选择mpi_t1。

然后,找到Executable编辑框右侧的向下箭头,选择Select other,在路径里输入/usr/bin/mpiexec ,点击OK即可

然后在Program arguments里输入-n 4 ./<你的应用可执行文件的名字> ,比如我这里叫mpi_t1,应该输入-n 4 ./mpi_t1 ,这里4代表的是你电脑处理器的核心数,如果你的电脑没有4核心,也要修改。

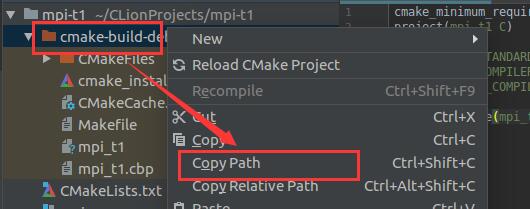
然后修改Working directory,为你的项目目录+cmake-build-debug ,一个比较简单的方式是直接到项目左侧的项目文件栏右键cmake-build-debug 文件夹,然后选择Copy Path

最后修改的效果如下:

现在,你可以使用Build+Run来直接编译和运行你的OpenMPI程序了。

python在ROS中订阅地图消息,在opencv中可视化

在本例中,博主将介绍如何把OccupancyGrid的地图数据在opencv中可视化。

首先,我们阅读OccupancyGrid的文档,可以发现这个结构体主要分为两部分,其MapMetaData存储的是地图的元数据,比如宽度,高度,分辨率等信息。而int8[] data 是一个行主序的数组,数组的值为当前区域被占用的可能性,值域为[0,100],特别地,未知区域的值为-1。

下面是关键部分的示例代码,我们首先订阅一次/map 的消息,并且获取地图元信息,然后我们创建一个numpy数组,并且将可能性的值转换为0-255的颜色。不过在下面的代码中,我将忽略这一特性。所以在probability > 0 这直接写了color=0 ,实际上你可以使用color = (1 – probability) * 255 来代替这一行。最后,因为map_server生成的默认地图未知区域的颜色为205,所以空的numpy数组在一开始用了205来进行填充。

from nav_msgs.msg import OccupancyGrid
map_message = rospy.wait_for_message("/map", OccupancyGrid, 3)  # type: OccupancyGrid
map_width = map_message.info.width
map_height = map_message.info.height
resolution = map_message.info.resolution
origin = map_message.info.origin.position
map_data = np.reshape(map_message.data, (map_width, map_height))
map_rgb = np.zeros((map_width, map_height, 3), np.uint8)
map_rgb.fill(205)
for row in range(map_height):
    for col in range(map_width):
        probability = map_data[row, col]
        if probability == -1:
            continue
        if probability > 0:
            color = 0
        else:
            color = 255
        map_rgb[row, col] = (color, color, color)
map_rgb = cv2.flip(map_rgb, 0)


重装Win10并删除ESP分区后,修复Ubuntu16在UEFI的双系统引导

介绍

最近笔记本的win10一直无法升级到最新版本,查看原因后发现是ESP分区太小了,只有不到100M,而win10推荐的大小是至少500-700M的空间。为了扩大处于分区表开头位置的ESP分区,我删除了ESP以及在ESP之后的win10系统分区。现在硬盘上还存在于Ubuntu的两个分区,一个是挂载点/ ,一个是/home

由于ESP分区直接被删除并且在Win10的重新安装中被彻底重置,原先Ubuntu的EFI启动文件已经被删除。经过多方查找资料。修复的方法如下。

首先,我们用一个Ubuntu的live cd(刻录的U盘也是可以的)启动系统。如果你想先启动你之前的Ubuntu系统内核,请遵循下面的步骤,如果想直接用live cd修复,请直接到修复部分。

启动原Ubuntu内核

在GURB页面按c进去命令行模式,接着输入ls 命令。屏幕中会显示目前所有识别的硬盘以及分区。比如(hd0,gpt1), (ht0,gpt2) 之类的。接下来,使用命令ls (hd0,gpt1)/ 查看这些分区下面的文件夹,找到原先Ubuntu系统/ 挂载点所在的分区。用上面的命令尝试所有的分区(更改命令中的gpt1 为对应的序号),找到含有/boot 文件夹的分区。

找到之后(比如我们确定了是gpt3 ),我们输入set root=(hd0,gpt3)

然后,我们输入set pager=1 来确保分屏显示。

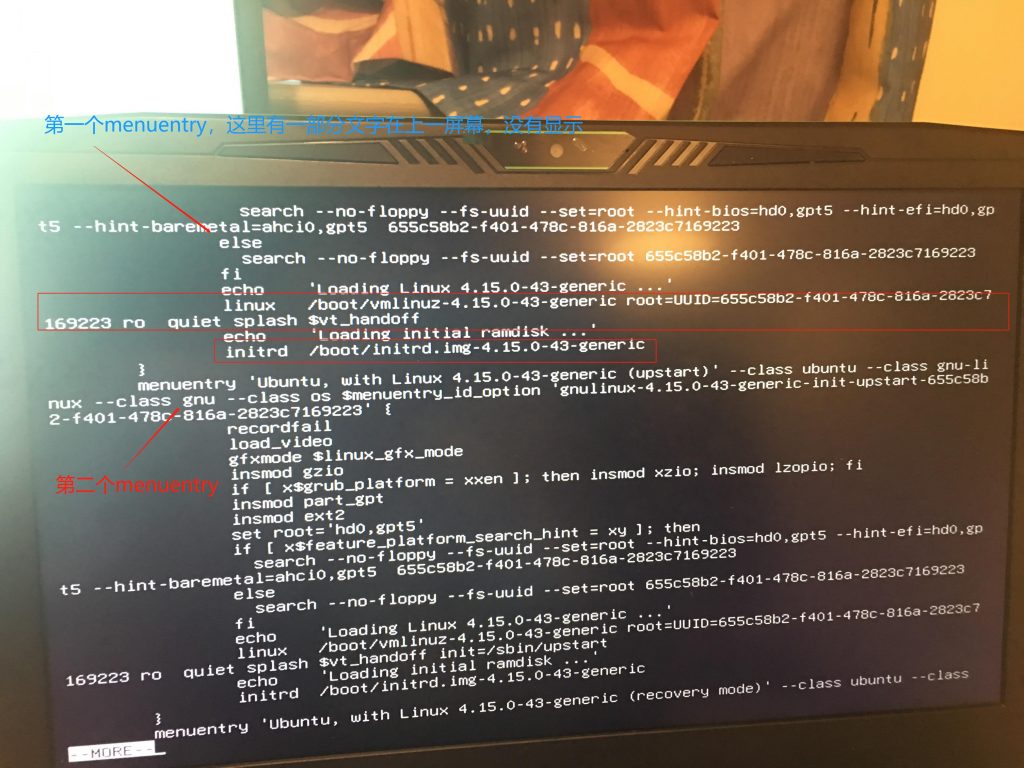
然后,输入cat /boot/grub/grub.cfg 来查看原grub的配置文件。找到第一个menuentry 的启动项。

记录上面以linux 开头这一行的命令,注意可能有折行,要一直抄到尾部,UUID不能错。

然后,稍微上面几行,记录以initrd 开头这一行的命令。

然后,我们依次输入上面记录的两个命令,注意不要出错。最好拍照片拍下来,除了UUID,其他路径部分都是可以用tab补全的。

最后,我们输入boot 命令,启动系统。

修复引导

如果你是使用live cd,请先输入下面的命令进入root用户

sudo -i

然后,我们添加boot-repair 的ppa源并安装,我们需要使用这款软件进行修复。

sudo add-apt-repository ppa:yannubuntu/boot-repair
sudo apt-get update
sudo apt-get install boot-repair

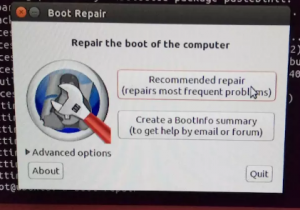
然后,我们使用sudo boot-repair 命令运行这个工具,然后选择第一个选项。然后按照该工具的提醒进行修复即可。最后这个工具会生成一个报告,可能会花一点时间,耐心等待就好。

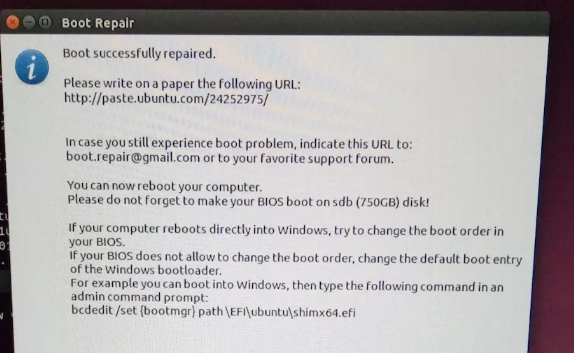
显示下面这样的提示证明修复成功,可以重新启动系统进入BIOS调整UEFI的启动顺序为ubuntu即可。

博主在使用boot-repair完成修复后,发现编辑/etc/default/grub 的自定义设置不生效了,并且boot-repair生成的启动菜单项目太多。如果你也遇到上面的问题,你可以在上面的所有操作完成后,进入到你的Ubuntu系统,运行下面的命令重装你的GRUB2

grub-install -v
update-grub

然后再重启系统即可。