分类目录归档:ROS

Compile HATP planner under Ubuntu 16 | Ubuntu 16 编译 HATP

Recently, my project needs the HATP planner. Compiling under Ubuntu 16 encountered the following problems. Here I wrote down some solutions.

Error: Could not find Antlr

This problem is caused by not installing Antlr2.7.7, so we need compile and install Antlr.

First, download the source package from https://www.antlr2.org/download/antlr-2.7.7.tar.gz

You may meet the following problem during compiling, caused by CharScanner.cpp

make[3]: Entering directory '/home/mydansun/antlr-2.7.7/lib/cpp/src'
*** compiling /home/mydansun/antlr-2.7.7/lib/cpp/src/../../../lib/cpp/src/CharScanner.cpp
In file included from /home/mydansun/antlr-2.7.7/lib/cpp/src/../../../lib/cpp/src/CharScanner.cpp:10:0:
/home/mydansun/antlr-2.7.7/scripts/../lib/cpp/antlr/CharScanner.hpp:474:30: error: ‘EOF’ was not declared in this scope
  static const int EOF_CHAR = EOF;
                              ^
/home/mydansun/antlr-2.7.7/scripts/../lib/cpp/antlr/CharScanner.hpp: In member function ‘bool antlr::CharScannerLiteralsLess::operator()(const string&, const string&) const’:
/home/mydansun/antlr-2.7.7/scripts/../lib/cpp/antlr/CharScanner.hpp:565:41: error: ‘strcasecmp’ was not declared in this scope
   return (strcasecmp(x.c_str(),y.c_str())<0);

The solution is to modify the CharScanner.hpp file manually, add the following code at the beginning.

#include <stdio.h>
#include <strings.h>

The above modification refers to the following two posts

  1. https://stackoverflow.com/questions/4577453/fcgio-cpp50-error-eof-was-not-declared-in-this-scope
  2. https://stackoverflow.com/questions/7248509/strcasecmp-was-not-declared-in-this-scope

After the compilation and installation, when I tried to execute the antlr command, I got this error: Could not find or load main class antlr.Tool

Then I found that there is no antlr.jar file in the /usr/local/lib directory, just copy this file (in the source code directory) to /usr/local/lib.

Important: When compiling HATP later, please use the following command to declare the executable path of Antlr. Otherwise, you may get this error: Unable to find Antlr executable!

catkin_make -DAntlr_BIN=/usr/local/bin/antlr

Error: No rule to make target /usr/lib/libantlr.a

Execute the following command.

sudo ln -s /usr/local/lib/libantlr.a /usr/lib/libantlr.a

Error: toaster_msgs/GetInfoDB.h: No such file or directory

This is because toaster is not installed, please visit the following link

https://github.com/laas/toaster/wiki/Installation

Toaster.git can be cloned into the same workspace as HATP and compile together.

Error: No rule to make target ‘/lib/libtoaster.so’

Execute the following command.

sudo ln -s /usr/local/lib/libtoaster.so /lib/libtoaster.so

最近项目需要HATP规划器,在Ubuntu 16下编译遇到了下面的问题,这里记录一下解决方案。

错误:Could not find Antlr

这个问题是没有安装Antlr2.7.7导致的,我们先编译安装Antlr

首先,下载源码包https://www.antlr2.org/download/antlr-2.7.7.tar.gz

在编译过程中遇到下面的问题,CharScanner.cpp编译失败

make[3]: Entering directory '/home/mydansun/antlr-2.7.7/lib/cpp/src'
*** compiling /home/mydansun/antlr-2.7.7/lib/cpp/src/../../../lib/cpp/src/CharScanner.cpp
In file included from /home/mydansun/antlr-2.7.7/lib/cpp/src/../../../lib/cpp/src/CharScanner.cpp:10:0:
/home/mydansun/antlr-2.7.7/scripts/../lib/cpp/antlr/CharScanner.hpp:474:30: error: ‘EOF’ was not declared in this scope
  static const int EOF_CHAR = EOF;
                              ^
/home/mydansun/antlr-2.7.7/scripts/../lib/cpp/antlr/CharScanner.hpp: In member function ‘bool antlr::CharScannerLiteralsLess::operator()(const string&, const string&) const’:
/home/mydansun/antlr-2.7.7/scripts/../lib/cpp/antlr/CharScanner.hpp:565:41: error: ‘strcasecmp’ was not declared in this scope
   return (strcasecmp(x.c_str(),y.c_str())<0);

解决方案就是手动修改CharScanner.hpp 文件,在开头加上下面的代码

#include <stdio.h>
#include <strings.h>

上面的修改参考了下面两篇文章

  1. https://stackoverflow.com/questions/4577453/fcgio-cpp50-error-eof-was-not-declared-in-this-scope
  2. https://stackoverflow.com/questions/7248509/strcasecmp-was-not-declared-in-this-scope

编译安装结束后,尝试执行antlr 命令,却提示Error: Could not find or load main class antlr.Tool

然后发现在/usr/local/lib 目录里没有antlr.jar 文件,将源码目录中的同名文件拷贝到该目录即可。

非常重要:后面编译HATP的时候,请使用下面的命令执行Antlr的可执行文件路径。否则会出现Unable to find Antlr executable!的问题

catkin_make -DAntlr_BIN=/usr/local/bin/antlr

错误:No rule to make target /usr/lib/libantlr.a

执行下面的命令

sudo ln -s /usr/local/lib/libantlr.a /usr/lib/libantlr.a

错误:toaster_msgs/GetInfoDB.h: No such file or directory

这是因为没有安装toaster导致的,参考下面的链接https://github.com/laas/toaster/wiki/Installation

其中toaster.git可以克隆到和HATP相同的workspace,一起编译即可。

错误:No rule to make target ‘/lib/libtoaster.so’

执行下面的命令

sudo ln -s /usr/local/lib/libtoaster.so /lib/libtoaster.so
Ubuntu16 and ROS Kinetic安装ROSPlan | Install ROSPlan with Ubuntu16 and ROS Kinetic

该文章首次编写于2020年1月24日,在该时间点后可能会有新的改变导致安装失败,如果有问题请查看官方文档的更新或给我评论。

我假设你已经安装了ROS核心组件

首先,安装依赖

sudo apt install flex bison freeglut3-dev libbdd-dev python-catkin-tools ros-$ROS_DISTRO-navigation ros-$ROS_DISTRO-tf2-bullet
sudo apt-get install python-pymongo mongodb scons

然后创建一个存放ROSPlan包的工作空间,我假设你使用~/ros_playground .

打开这个工作空间的src目录,克隆所需要的文件

cd ~/ros_playground/src
git clone https://github.com/KCL-Planning/ROSPlan.git
git clone https://github.com/KCL-Planning/rosplan_demos.git
git clone https://github.com/clearpathrobotics/occupancy_grid_utils.git
git clone -b kinetic-devel https://github.com/strands-project/mongodb_store.git


然后,返回上一级目录,编译

cd ../
catkin_make


使用下面的命令为数据库创建一个文件夹,否则你后面会遇到类似下面的错误

Can’t find database at supplied path ~/ros_playground/src/ROSPlan/rosplan_knowledge_base/common/mongoDB/. If this is a new DB, create it as an empty directory

mkdir -p ~/ros_playground/src/ROSPlan/rosplan_knowledge_base/common/mongoDB/


现在,你可以返回官网继续教程了,在启动tutorial_01.launc 之前别忘了运行roscore


This article is written on 24 Jan 2020. Some materials may be expired after that time, please check the latest related documents.

Install the following dependencies.

sudo apt install flex bison freeglut3-dev libbdd-dev python-catkin-tools ros-$ROS_DISTRO-navigation ros-$ROS_DISTRO-tf2-bullet
sudo apt-get install python-pymongo mongodb scons


Select or create a workspace for the ROSPlan package. I assume you are using ~/ros_playground .

Go to the source folder of your workspace and clone all the necessary packages by using Git.

cd ~/ros_playground/src
git clone https://github.com/KCL-Planning/ROSPlan.git
git clone https://github.com/KCL-Planning/rosplan_demos.git
git clone https://github.com/clearpathrobotics/occupancy_grid_utils.git
git clone -b kinetic-devel https://github.com/strands-project/mongodb_store.git


Go to the parent directory and compile these packages

cd ../
catkin_make


Create an empty directory for the new database or you will get an error such like Can’t find database at supplied path ~/ros_playground/src/ROSPlan/rosplan_knowledge_base/common/mongoDB/. If this is a new DB, create it as an empty directory

mkdir -p ~/ros_playground/src/ROSPlan/rosplan_knowledge_base/common/mongoDB/


Now, you can try to back to the official tutorial. Please remind before you execute the tutorial_01.launch  you need to run a ROS master node at first. For example, try to execute

roscore


python在ROS中订阅地图消息,在opencv中可视化

在本例中,博主将介绍如何把OccupancyGrid的地图数据在opencv中可视化。

首先,我们阅读OccupancyGrid的文档,可以发现这个结构体主要分为两部分,其MapMetaData存储的是地图的元数据,比如宽度,高度,分辨率等信息。而int8[] data 是一个行主序的数组,数组的值为当前区域被占用的可能性,值域为[0,100],特别地,未知区域的值为-1。

下面是关键部分的示例代码,我们首先订阅一次/map 的消息,并且获取地图元信息,然后我们创建一个numpy数组,并且将可能性的值转换为0-255的颜色。不过在下面的代码中,我将忽略这一特性。所以在probability > 0 这直接写了color=0 ,实际上你可以使用color = (1 – probability) * 255 来代替这一行。最后,因为map_server生成的默认地图未知区域的颜色为205,所以空的numpy数组在一开始用了205来进行填充。

from nav_msgs.msg import OccupancyGrid
map_message = rospy.wait_for_message("/map", OccupancyGrid, 3)  # type: OccupancyGrid
map_width = map_message.info.width
map_height = map_message.info.height
resolution = map_message.info.resolution
origin = map_message.info.origin.position
map_data = np.reshape(map_message.data, (map_width, map_height))
map_rgb = np.zeros((map_width, map_height, 3), np.uint8)
map_rgb.fill(205)
for row in range(map_height):
    for col in range(map_width):
        probability = map_data[row, col]
        if probability == -1:
            continue
        if probability > 0:
            color = 0
        else:
            color = 255
        map_rgb[row, col] = (color, color, color)
map_rgb = cv2.flip(map_rgb, 0)


Turtlebot plays Robotic Cluedo Demo

Project Description

You are asked to implement a program that plays Robotic Cluedo! Robotic Cluedo is slightly different than the board game Cluedo. In our version, your robot needs to visit a room in an arena and identify the character and weapon in the room along with their location.

Project Demo

University of Leeds

Orestis Pourgourides, Chengke Sun, Antonis Simonis, Nikolay Kyorov

项目描述

机器人访问一个已知地图的房间,在该房间内寻找和识别数张不同的海报。

项目演示

(墙内观看)https://www.bilibili.com/video/av41989932/

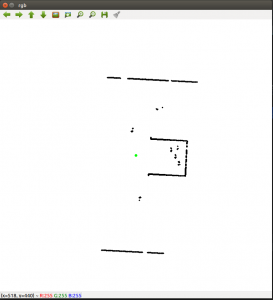
ROS激光传感器可视化

问题描述

实验平台:TIAGo

编程语言:Python

TIAGo所使用的激光传感器在移动基座的底部,具体的描述信息如下

Laser range-finder

Located at the front of the base. This sensor measures distances in a horizontal plane. It is a valuable asset for navigation and mapping. Bad measurements can be caused by reflective or transparent surfaces.

为了获取激光数据,我们必须订阅/scan 消息,消息返回的类型为sensor_msgs/LaserScan ,该类型的文档可以访问http://docs.ros.org/indigo/api/sensor_msgs/html/msg/LaserScan.html查看,这里为了方便,我直接摘抄这个结构体的描述文档到了下面

std_msgs/Header header
float32 angle_min
float32 angle_max
float32 angle_increment
float32 time_increment
float32 scan_time
float32 range_min
float32 range_max
float32[] ranges
float32[] intensities

其中ranges是一个浮点数组,每个数组成员代表着激光传感器返回的距离,这个距离有可能是inf,因为激光传感器可能会因为没有探测到物体而返回无限远。这个我们需要在后面留意一下。intensities也是一个浮点数组,用来保存对应ranges上的强度。

所有代码如下:

#!/usr/bin/env python

import cv2
import numpy as np
import time
import rospy
from sensor_msgs.msg import LaserScan
import os

def scan_callback(data):
    distances = data.ranges
    angle_min = data.angle_min
    angle_increment = data.angle_increment

    pixels_relative_center = []
    for index in range(len(distances)):
        distance = distances[index]
        if distance == float('inf'):
            continue
        angle = angle_min + angle_increment * index
        x = np.cos(angle) * distance
        y = np.sin(angle) * distance

        pixel_x = int(round(x * 30))
        pixel_y = int(round(y * 30))
        pixels_relative_center.append((pixel_x, pixel_y))

    pixels_relative_center = list(set(pixels_relative_center))

    # create rgb image
    rgb_image = np.zeros((801, 801, 3), np.uint8)
    rgb_image.fill(255)

    pixels_relative_origin = []
    for (pixel_x, pixel_y) in pixels_relative_center:
        col = 400 + pixel_x
        row = 400 - pixel_y
        pixels_relative_origin.append((row, col))

    # draw the point
    for (row, col) in pixels_relative_origin:
        cv2.circle(rgb_image, (col, row), 2, (0, 0, 0), -1)

    # draw the point of robot
    cv2.circle(rgb_image, (400, 400), 4, (0, 255, 0), -1)

    cv2.imshow("rgb", rgb_image)
    cv2.waitKey(30)


def shutdown():
    cv2.destroyAllWindows()
    # noinspection PyProtectedMember
    os._exit(0)


rospy.on_shutdown(shutdown)
rospy.init_node('laser_image', anonymous=True)
rospy.Subscriber("/scan", LaserScan, scan_callback, queue_size=5)
while True:
    time.sleep(1)

可以持续移动机器人,将会发现数据图随着机器人的变化而变化。

代码讲解

使用循环,每次步进angle_increment 的角度,然后使用了三角函数公式来计算出激光数据点相对于机器人中心点(准确说应该是/base_laser_link,但是这里为了简便就说是中心点了)的坐标x和y。

x = np.cos(angle) * distance
y = np.sin(angle) * distance

为了能够将x,y坐标转换为像素的个数(方便显示),我将他们整体扩大了30倍。实际情况中如果有map,应该结合map的分辨率来计算这个值

pixel_x = int(round(x * 30))
pixel_y = int(round(y * 30))

然后,我们新建了一个801×801的空白画布。这个画布大小是我自己定义的,足够容纳我实验环境下激光传感器返回的所有点。pixels_relative_center 数组保存的是相对于机器人中心点,激光数据点的像素坐标。在后面的循环中,我们将这些数据点转换为相对于画布原点的像素坐标,并将他们放在pixels_relative_origin 数组中。这里需要注意的是,opencv画布坐标轴的位置和方向是不一样的。400就是我们的画布中心点,所以转换方式如下

col = 400 + pixel_x
row = 400 - pixel_y

最后,我们将这些点画出来即可

cv2.circle(rgb_image, (col, row), 2, (0, 0, 0), -1)