月度归档:2015年07月

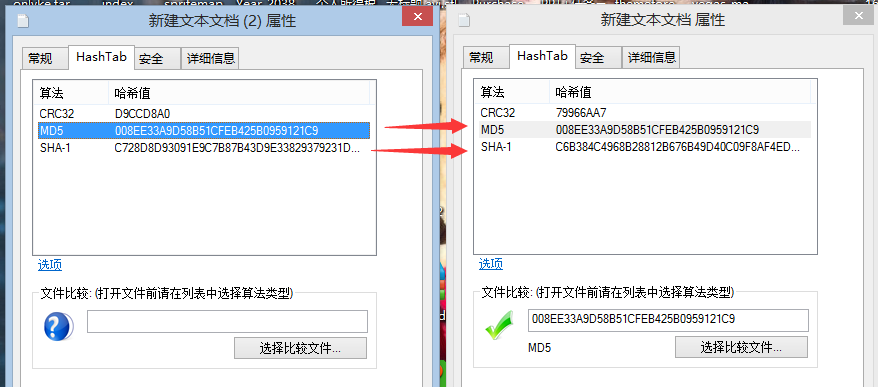
md5冲突演示

碰撞文件下载:http://pan.baidu.com/s/15Ac7W 密码: uqua

QQ图片20150725153106


下面给出两个文件的十六进制数据,请注意每个文件的后两行

文件1数据

4D C9 68 FF 0E E3 5C 20 95 72 D4 77 7B 72 15 87 
D3 6F A7 B2 1B DC 56 B7 4A 3D C0 78 3E 7B 95 18 
AF BF A2 00 A8 28 4B F3 6E 8E 4B 55 B3 5F 42 75 
93 D8 49 67 6D A0 D1 55 5D 83 60 FB 5F 07 FE A2 

文件2数据

4D C9 68 FF 0E E3 5C 20 95 72 D4 77 7B 72 15 87 
D3 6F A7 B2 1B DC 56 B7 4A 3D C0 78 3E 7B 95 18 
AF BF A2 02 A8 28 4B F3 6E 8E 4B 55 B3 5F 42 75 
93 D8 49 67 6D A0 D1 D5 5D 83 60 FB 5F 07 FE A2 

启动smaba后Nginx出现open() XXX failed (11: Resource temporarily unavailable)

该问题出现的症状是,当在启用smb的服务器上修改css或者js文件时,第一次刷新Nginx出现500错误,往后刷新却返回正常

查看Nginx日志发现所有资源错误为open() “资源路径 failed (11: Resource temporarily unavailable)

解决方案:请在smb的配置文件上加上,重启即可

oplocks = no
level2 oplocks = no

Nginx访问PHP文件的File not found错误处理,两种情况

这个错误很常见,原有有下面两种几种

1. php-fpm找不到SCRIPT_FILENAME里执行的php文件

2. php-fpm不能访问所执行的php,也就是权限问题

第一种情况

可以在你的location php 里面添加当文件不存在时返回404而不是交给php-fpm进行处理

location ~ \.php$
{
	...
	#文件不存在转404
	try_files	$uri = 404;
	...
}

然后,在你的配置文件中找到下面这段

fastcgi_param  SCRIPT_FILENAME  /scripts$fastcgi_script_name;

替换成下面

fastcgi_param  SCRIPT_FILENAME  $document_root$fastcgi_script_name;

然后重新加载nginx配置文件

/etc/init.d/nginx reload

第二种情况

两种解决方法:
第一种,就是把你root文件夹设为其他用户允许
第二种,找到你的php-fpm的配置文件,找到下面这段,把apache替换成你要的用户组

; RPM: apache Choosed to be able to access some dir as httpd
user = apache
; RPM: Keep a group allowed to write in log dir.
group = apache

CentOS的Nginx下安装高版本php+mysql

1. 首先安装 Remi Repository

## Install Remi & Epel Repository on RHEL/CentOS 6.4-6.0 - 32 Bit ##
rpm -Uvh http://download.fedoraproject.org/pub/epel/6/i386/epel-release-6-8.noarch.rpm
rpm -Uvh http://rpms.famillecollet.com/enterprise/remi-release-6.rpm 

## Install Remi & Epel Repository on RHEL/CentOS 6.4-6.0 - 64 Bit ## (6.5也可用)
rpm -Uvh http://download.fedoraproject.org/pub/epel/6/x86_64/epel-release-6-8.noarch.rpm
rpm -Uvh http://rpms.famillecollet.com/enterprise/remi-release-6.rpm 

## Install Remi Repository on RHEL/CentOS 5.9-5.0 - 32 Bit ##
rpm -Uvh http://dl.fedoraproject.org/pub/epel/5/i386/epel-release-5-4.noarch.rpm
rpm -Uvh http://rpms.famillecollet.com/enterprise/remi-release-5.rpm

## Install Remi Repository on RHEL/CentOS 5.9-5.0 - 64 Bit ##
rpm -Uvh http://dl.fedoraproject.org/pub/epel/5/x86_64/epel-release-5-4.noarch.rpm
rpm -Uvh http://rpms.famillecollet.com/enterprise/remi-release-5.rpm

2. 安装mysql

yum --enablerepo=remi,remi-test install mysql mysql-server

3. 配置mysql的root密码并开机启用mysql,这里密码我用123456

service mysqld start
/usr/bin/mysqladmin -u root password '123456'
chkconfig mysqld on

4. 安装php,php-fpm和php扩展

yum --enablerepo=remi,remi-test install php php-fpm php-common php-mysql php-gd php-mbstring php-xml

5. 启动php-fpm并设置为开机启动

service php-fpm start
chkconfig php-fpm on

回到你nginx的配置文件,也就是nginx.conf,如果你不是编译安装的也有可能是/etc/nginx/conf.d/的default.conf,把下面这部分的#号(注释)都去掉。

location ~ \.php$ {
    root           html;
    fastcgi_pass   127.0.0.1:9000;
    fastcgi_index  index.php;
    fastcgi_param  SCRIPT_FILENAME  /scripts$fastcgi_script_name;
    include        fastcgi_params;
}

然后重新加载nginx配置文件

/etc/init.d/nginx reload

注意:

这时如果你访问php文件出现file not found错误,请返回nginx配置文件,将下面这部分的文字

fastcgi_param  SCRIPT_FILENAME  /scripts$fastcgi_script_name;

替换成下面

fastcgi_param  SCRIPT_FILENAME  $document_root$fastcgi_script_name;

然后重新加载nginx配置文件,刷新浏览即可恢复正常

/etc/init.d/nginx reload

提示:

如果想让conf包含其他的conf,可以写追加

include /opt/nginx/conf.d/*.conf;
CentOS编译安装nginx-1.8.0

首先去http://nginx.org/en/download.html下载nginx-1.8.0,这里我下载到opt目录

后面我要设置nginx使用nginx用户和nginx用户组,所以执行下面命令

groupadd nginx
useradd -g nginx -s /sbin/nologin -M nginx

接下来安装编译环境

yum -y install pcre-devel
yum -y install gcc gcc-c++ ncurses-devel perl
yum -y install zlib zlib-devel
yum -y install openssl openssl-devel

然后解压文件准备编译

cd /opt
tar -zxvf nginx-1.8.0.tar.gz
cd nginx-1.8.0

开始编译和安装

./configure --user=nginx --group=nginx --prefix=/opt/nginx --with-http_stub_status_module  --with-http_ssl_module  --with-http_flv_module --with-http_gzip_static_module
make
make install

编译完成之后,测试安装效果,出现版本号为安装成功

cd /opt/nginx/sbin
./nginx -v

QQ截图20150720002918

将以下脚本保存为nginx文件就在/etc/init.d目录下,注意如果你用外部编辑器请确认换行符为LINUX的,编码正确,其中/opt/nginx/请替换成你的安装目录

#!/bin/bash
# nginx Startup script for the Nginx HTTP Server
# this script create it by jackbillow at 2007.10.15.
# it is v.0.0.2 version.
# if you find any errors on this scripts,please contact jackbillow.
# and send mail to jackbillow at gmail dot com.
#
# chkconfig: - 85 15
# description: Nginx is a high-performance web and proxy server.
#              It has a lot of features, but it's not for everyone.
# processname: nginx
# pidfile: /usr/local/nginx/logs/nginx.pid
# config: /usr/local/nginx/conf/nginx.conf
 
nginxd=/opt/nginx/sbin/nginx
nginx_config=/opt/nginx/conf/nginx.conf
nginx_pid=/opt/nginx/logs/nginx.pid
 
RETVAL=0
prog="nginx"
 
# Source function library.
. /etc/rc.d/init.d/functions
 
# Source networking configuration.
. /etc/sysconfig/network
 
# Check that networking is up.
[ ${NETWORKING} = "no" ] && exit 0
 
[ -x $nginxd ] || exit 0
 
 
# Start nginx daemons functions.
start() {
 
if [ -e $nginx_pid ];then
   echo "nginx already running...."
   exit 1
fi
 
   echo -n $"Starting $prog: "
   daemon $nginxd -c ${nginx_config}
   RETVAL=$?
   echo
   [ $RETVAL = 0 ] && touch /var/lock/subsys/nginx
   return $RETVAL
 
}
 
 
# Stop nginx daemons functions.
stop() {
        echo -n $"Stopping $prog: "
        killproc $nginxd
        RETVAL=$?
        echo
        [ $RETVAL = 0 ] && rm -f /var/lock/subsys/nginx /usr/local/nginx/logs/nginx.pid
}
 
 
# reload nginx service functions.
reload() {
 
    echo -n $"Reloading $prog: "
    #kill -HUP `cat ${nginx_pid}`
    killproc $nginxd -HUP
    RETVAL=$?
    echo
 
}
 
# See how we were called.
case "$1" in
start)
        start
        ;;
 
stop)
        stop
        ;;
 
reload)
        reload
        ;;
 
restart)
        stop
        start
        ;;
 
status)
        status $prog
        RETVAL=$?
        ;;
*)
        echo $"Usage: $prog {start|stop|restart|reload|status|help}"
        exit 1
esac
 
exit $RETVAL

然后执行下列命令,把nginx加入系统服务并设置成开机启动。如果你的配置跟我不一样请注意目录,用户名和用户组的替换

chmod 755 /etc/init.d/nginx
chkconfig --add nginx
chkconfig nginx on
chown -R nginx:nginx /opt/nginx

最后启动nginx就可以了,别忘了开放80端口

service nginx start
iptables -I INPUT -p tcp --dport 80 -j ACCEPT
service iptables save
chkconfig iptables on

给CentOS系统安装yum插件,提升yum下载速度

在中国大陆经常遇到yum非常慢的问题。。非常耽误时间,我们可以通过一些插件来提升yum的下载速度。

首先安装fastestmirror插件,这个插件会智能选择下载速度最快的yum源。

yum install yum-fastestmirror

然后到http://pkgs.repoforge.org/axel/下载axel

CentOS6.5 64位系统,我们使用axel-2.4-1.el6.rf.x86_64.rpm,然后安装

rpm -ivh axel-2.4-1.el6.rf.x86_64.rpm

最后确认/etc/yum.conf中plugins=1

效果还是很明显的

QQ图片20150720001621

CentOS双网卡设置

环境:eth0是外网的DHCP,eth1是内网的静态ip

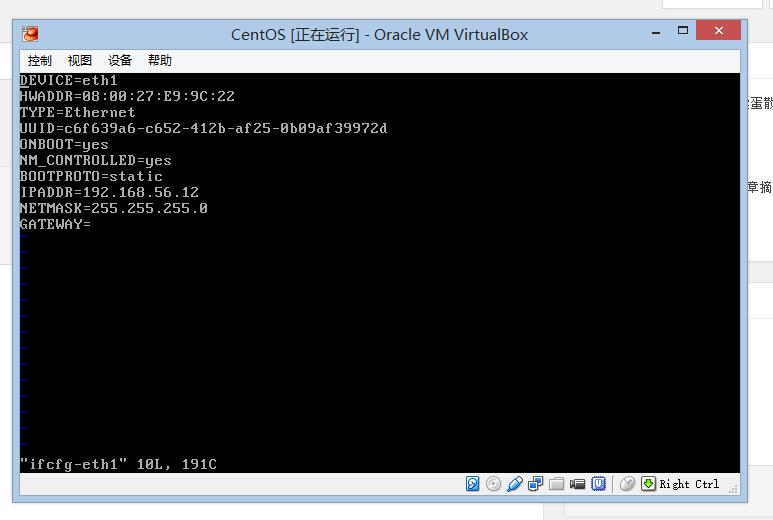
eth1的配置如下

QQ截图20150719210742

修改/etc/sysctl.conf,找到net.ipv4.ip_forward将其值修改为1

然后执行下面命令

iptables -t nat -A POSTROUTING -o ppp0 -j MASQUERADE

最后重启,网络服务即可

service netowrk restart