标签归档:Ubuntu

Ubuntu16 and ROS Kinetic安装ROSPlan | Install ROSPlan with Ubuntu16 and ROS Kinetic

该文章首次编写于2020年1月24日,在该时间点后可能会有新的改变导致安装失败,如果有问题请查看官方文档的更新或给我评论。

我假设你已经安装了ROS核心组件

首先,安装依赖

sudo apt install flex bison freeglut3-dev libbdd-dev python-catkin-tools ros-$ROS_DISTRO-navigation ros-$ROS_DISTRO-tf2-bullet
sudo apt-get install python-pymongo mongodb scons

然后创建一个存放ROSPlan包的工作空间,我假设你使用~/ros_playground .

打开这个工作空间的src目录,克隆所需要的文件

cd ~/ros_playground/src
git clone https://github.com/KCL-Planning/ROSPlan.git
git clone https://github.com/KCL-Planning/rosplan_demos.git
git clone https://github.com/clearpathrobotics/occupancy_grid_utils.git
git clone -b kinetic-devel https://github.com/strands-project/mongodb_store.git


然后,返回上一级目录,编译

cd ../
catkin_make


使用下面的命令为数据库创建一个文件夹,否则你后面会遇到类似下面的错误

Can’t find database at supplied path ~/ros_playground/src/ROSPlan/rosplan_knowledge_base/common/mongoDB/. If this is a new DB, create it as an empty directory

mkdir -p ~/ros_playground/src/ROSPlan/rosplan_knowledge_base/common/mongoDB/


现在,你可以返回官网继续教程了,在启动tutorial_01.launc 之前别忘了运行roscore


This article is written on 24 Jan 2020. Some materials may be expired after that time, please check the latest related documents.

Install the following dependencies.

sudo apt install flex bison freeglut3-dev libbdd-dev python-catkin-tools ros-$ROS_DISTRO-navigation ros-$ROS_DISTRO-tf2-bullet
sudo apt-get install python-pymongo mongodb scons


Select or create a workspace for the ROSPlan package. I assume you are using ~/ros_playground .

Go to the source folder of your workspace and clone all the necessary packages by using Git.

cd ~/ros_playground/src
git clone https://github.com/KCL-Planning/ROSPlan.git
git clone https://github.com/KCL-Planning/rosplan_demos.git
git clone https://github.com/clearpathrobotics/occupancy_grid_utils.git
git clone -b kinetic-devel https://github.com/strands-project/mongodb_store.git


Go to the parent directory and compile these packages

cd ../
catkin_make


Create an empty directory for the new database or you will get an error such like Can’t find database at supplied path ~/ros_playground/src/ROSPlan/rosplan_knowledge_base/common/mongoDB/. If this is a new DB, create it as an empty directory

mkdir -p ~/ros_playground/src/ROSPlan/rosplan_knowledge_base/common/mongoDB/


Now, you can try to back to the official tutorial. Please remind before you execute the tutorial_01.launch  you need to run a ROS master node at first. For example, try to execute

roscore
 

配合Clion在Ubuntu上安装并使用OpenMPI

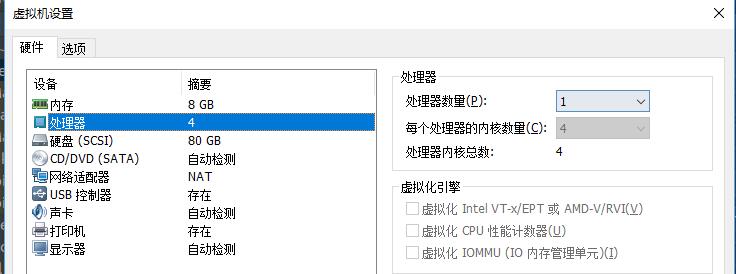
如果你在虚拟机上安装Ubuntu,请确认系统的CPU拥有多个核心,比如下图的4核心

首先,我们在Ubuntu上安装OpenMPI

sudo apt-get update
sudo apt-get install openmpi-bin openmpi-doc libopenmpi-dev

安装完成后,我们到Clion新建一个项目。打开项目的CMakeLists.txt,在任意set下加入下面的参数。

set(CMAKE_C_COMPILER /usr/bin/mpicc)
set(CMAKE_CXX_COMPILER /usr/bin/mpic++)

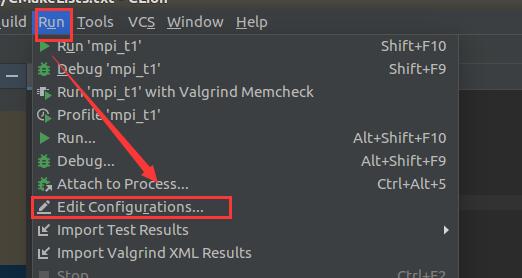
然后,我们打开菜单Run->Edit Configurations

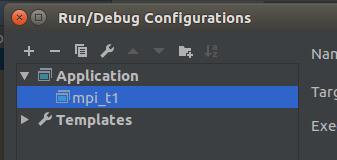
找到当前应用的配置文件(默认应该就是),比如我这里这个项目叫mpi_t1,左边应用就应该选择mpi_t1。

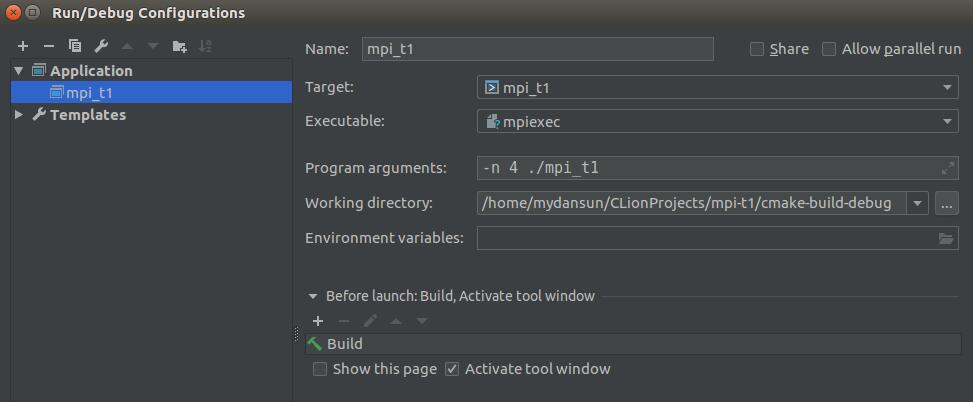
然后,找到Executable编辑框右侧的向下箭头,选择Select other,在路径里输入/usr/bin/mpiexec ,点击OK即可

然后在Program arguments里输入-n 4 ./<你的应用可执行文件的名字> ,比如我这里叫mpi_t1,应该输入-n 4 ./mpi_t1 ,这里4代表的是你电脑处理器的核心数,如果你的电脑没有4核心,也要修改。

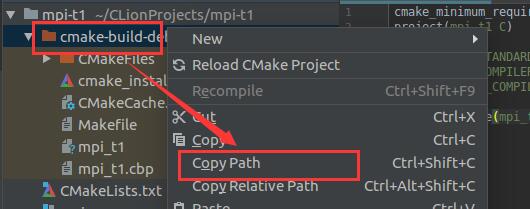
然后修改Working directory,为你的项目目录+cmake-build-debug ,一个比较简单的方式是直接到项目左侧的项目文件栏右键cmake-build-debug 文件夹,然后选择Copy Path

最后修改的效果如下:

现在,你可以使用Build+Run来直接编译和运行你的OpenMPI程序了。

重装Win10并删除ESP分区后,修复Ubuntu16在UEFI的双系统引导

介绍

最近笔记本的win10一直无法升级到最新版本,查看原因后发现是ESP分区太小了,只有不到100M,而win10推荐的大小是至少500-700M的空间。为了扩大处于分区表开头位置的ESP分区,我删除了ESP以及在ESP之后的win10系统分区。现在硬盘上还存在于Ubuntu的两个分区,一个是挂载点/ ,一个是/home

由于ESP分区直接被删除并且在Win10的重新安装中被彻底重置,原先Ubuntu的EFI启动文件已经被删除。经过多方查找资料。修复的方法如下。

首先,我们用一个Ubuntu的live cd(刻录的U盘也是可以的)启动系统。如果你想先启动你之前的Ubuntu系统内核,请遵循下面的步骤,如果想直接用live cd修复,请直接到修复部分。

启动原Ubuntu内核

在GURB页面按c进去命令行模式,接着输入ls 命令。屏幕中会显示目前所有识别的硬盘以及分区。比如(hd0,gpt1), (ht0,gpt2) 之类的。接下来,使用命令ls (hd0,gpt1)/ 查看这些分区下面的文件夹,找到原先Ubuntu系统/ 挂载点所在的分区。用上面的命令尝试所有的分区(更改命令中的gpt1 为对应的序号),找到含有/boot 文件夹的分区。

找到之后(比如我们确定了是gpt3 ),我们输入set root=(hd0,gpt3)

然后,我们输入set pager=1 来确保分屏显示。

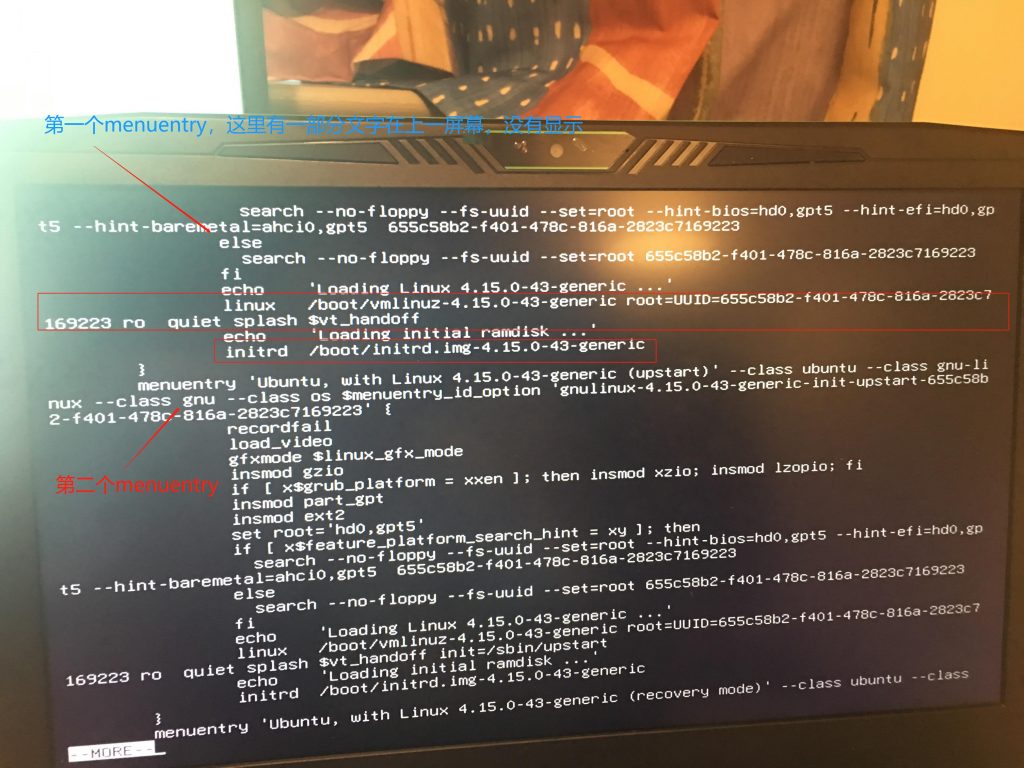
然后,输入cat /boot/grub/grub.cfg 来查看原grub的配置文件。找到第一个menuentry 的启动项。

记录上面以linux 开头这一行的命令,注意可能有折行,要一直抄到尾部,UUID不能错。

然后,稍微上面几行,记录以initrd 开头这一行的命令。

然后,我们依次输入上面记录的两个命令,注意不要出错。最好拍照片拍下来,除了UUID,其他路径部分都是可以用tab补全的。

最后,我们输入boot 命令,启动系统。

修复引导

如果你是使用live cd,请先输入下面的命令进入root用户

sudo -i

然后,我们添加boot-repair 的ppa源并安装,我们需要使用这款软件进行修复。

sudo add-apt-repository ppa:yannubuntu/boot-repair
sudo apt-get update
sudo apt-get install boot-repair

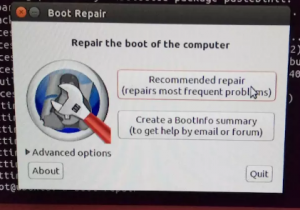
然后,我们使用sudo boot-repair 命令运行这个工具,然后选择第一个选项。然后按照该工具的提醒进行修复即可。最后这个工具会生成一个报告,可能会花一点时间,耐心等待就好。

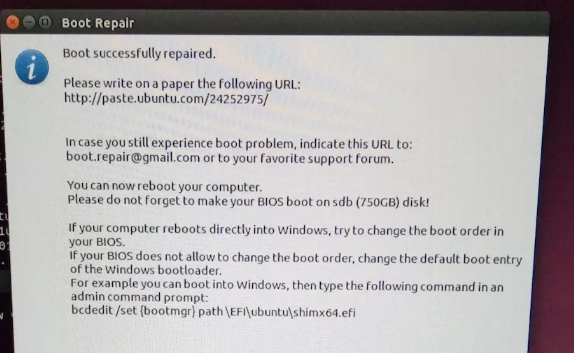
显示下面这样的提示证明修复成功,可以重新启动系统进入BIOS调整UEFI的启动顺序为ubuntu即可。

博主在使用boot-repair完成修复后,发现编辑/etc/default/grub 的自定义设置不生效了,并且boot-repair生成的启动菜单项目太多。如果你也遇到上面的问题,你可以在上面的所有操作完成后,进入到你的Ubuntu系统,运行下面的命令重装你的GRUB2

grub-install -v
update-grub

然后再重启系统即可。

Ubuntu 安装VirtualBox增强功能

首先保证虚拟机已经挂在增强功能的安装盘

以下命令均需要使用root用户登录或使用sudo执行

然后安装下面的软件包

apt-get install gcc make

然后,挂载光盘

mount /dev/sr0 /media/cdrom

最后,打开目录执行安装脚本即可,安装完之后需要重新启动

cd /media/cdrom
./VBoxLinuxAdditions.run


为Ubuntu新创建用户创建默认.bashrc并自动加载

首先,su – 到新创建的用户

拷贝默认的.bashrc过来

cp /etc/skel/.bashrc ~/

然后创建.profile文件

vi ~/.profile

粘贴下面的内容

# ~/.profile: executed by Bourne-compatible login shells.

if [ "$BASH" ]; then
  if [ -f ~/.bashrc ]; then
    . ~/.bashrc
  fi
fi

mesg n

想立即生效,执行下面命令

source ~/.profile


Ubuntu 编译安装shadowsocks-libev

编译安装shadowsocks-libev

shadowsocks-libev现在的默认分支为rm,clone的时候需要指定分支为master

git clone -b master https://github.com/shadowsocks/shadowsocks-libev.git
apt-get install build-essential autoconf libtool libssl-dev libpcre3 libpcre3-dev
./configure --disable-documentation && make
make install

当作为客户端使用时的配置文件

{
    "server":"服务器ip",
    "server_port":服务器端口, 
    "local_address":"127.0.0.1",
    "local_port":1080,
    "password":"密码",
    "timeout":300,
    "method":"chacha20",
    "fast_open":false,
    "workers":1
}

在Command Line Tools中使用ss代理

安装proxychains

apt-get install proxychains

编辑文件~/.proxychains/proxychains.conf

复制粘贴下面的内容

strict_chain
proxy_dns 
remote_dns_subnet 224
tcp_read_time_out 15000
tcp_connect_time_out 8000
localnet 127.0.0.0/255.0.0.0
quiet_mode

[ProxyList]
socks5  127.0.0.1 1080

使用方法

proxychains curl https://www.google.com
proxychains bash


Ubuntu通过gitolite快速部署git server并开启master分支网站代码自动部署

安装git和gitolite

首先,通过下面的命令安装git和gitolite

apt-get install git-core
apt-get install gitolite

添加git用户组

adduser --system --group --shell /bin/bash --disabled-password git

配置密钥

接下来在本地机器生成ssh密钥,使用下面的命令

ssh-keygen -t rsa -C "[email protected]"

当然,如果你想为你的gitolite分配单独的密钥,可以使用下面的命令(生成名为git-admin的密钥)

ssh-keygen -C "[email protected]" -f ~/.ssh/git-admin

如果你使用了单独分配的密钥,你需要配置你的git在连接指定域名时使用不同的密钥,比如我们这里gitolite的管理域名是admin.xxx.com 。我们在刚才的.ssh文件夹新建config 文件(没有扩展名),内容如下

Host admin.xxx.com
	IdentityFile ~/.ssh/git-admin

这样就可以在连接admin.xxx.com的时候使用git-admin这组密钥了

初始化gitolite

下一步,将你的ssh公钥上传到服务器的某个位置,比如/tmp/git-admin.pub

然后切换到git用户,使用这个公钥初始化gitolite

su - git 
gl-setup /tmp/git-admin.pub

然后在持有私钥的机器管理gitolite即可,下面是clone命令,注意修改ip地址

git clone git@git_server_IP_address:gitolite-admin

关于gitolite的官方文档在这里:http://gitolite.com/gitolite/gitolite.html

自动部署

然后关于配置自动部署,首先我需要部署的网站目录权限为www-data:www-data

我把git用户添加到了www-data组中,通过后面权限设置为770保证网站和git都有足够的权限操作文件。使用下面的命令

usermod -a -G www-data git

然后网站目录,比如创建/home/nginx/xxx ,我们要把这个目录的用户组改成www-data并给予770权限,这样以后我们的git用户才能操作

然后我们切换到git用户,在/home/nginx/xxx 目录克隆本地库,使用下面的命令。注意clone后面最后有一个参数.

su - git
git clone ~/repositories/xxx.git .

这样网站目录就初始化完成了,我们继续下面的操作(还是git用户的身份)

钩子文件创建在项目库的hooks文件夹~/repositories/xxx.git/hooks ,新建post-receive 文件,复制粘贴下面的内容,最后别忘了给予本脚本执行权限。就可以退出git用户身份了

#!/bin/bash

while read oldrev newrev ref
do
	branch=`echo $ref | cut -d/ -f3`
	echo "--- Current branch is : "$branch	
	if [ "master" == "$branch" ]; then
		unset GIT_DIR
		NowPath=`pwd`
		echo "--- Now path is :"$NowPath
		DeployPath="/home/nginx/xxx"
		echo "--- Deploy path is :"$DeployPath
		cd $DeployPath
		echo "--- Go to deploy path"
		git add -A && git fetch origin && git reset --hard origin/master
		chmod -f -R 770 *
		chown -f -R git:www-data *
		echo "--- Deploy done"
		cd $NowPath
		echo "--- Fine"
	fi
done
exit 0

解释一下:

首先我们循环读取所有push的请求,当发现是push到master(也就是我们的部署分支)时,触发部署脚本,首先要清楚GIT_DIR环境变量,这样才能切换工作目录。然后我们切换到nginx的网站目录,使用git add -A && git fetch origin && git reset –hard origin/master 强制清除本地变化并更新到远程master分支。如果有网站自动生成的文件(比如用户上传的附件目录)不想被清空的,别忘了要写在.gitignore 文件里。当然网站生成的文件请确保权限在770以上,否则可能会导致git无权操作。在更新完远程master分支的代码后,更新文件权限为770,并将所有者改成www-data组(chmod使用末尾的*可以确保不会修改网站目录下.git这个隐藏目录内部的权限,同时-f用来屏蔽错误信息)


在编写本篇文章的时候感谢下面这位非常热心的博主解答我好多问题
https://argcv.com/articles/2078.c