分类目录归档:系统

解决中国大陆在更新Chrome 显示Flash过期的问题

前几日,我把Chrome更新到了54.0.2840.71版本,更新后发现所有含有Flash的站点均被提示Flash版本过期(Shockwave flash 23.0.0.166)。而此时Chrome已经为最新版本,无法通过升级Chrome的方式来升级Flash,而由于墙的原因,按照官方指南,到chrome://components/中点击“检查是否有更新”并没有反应(其实我已经全局用ss翻墙了,但是不知道为什么依然没有作用)。

后来找到的解决方案如下:

到下面的地址下载最新版本的PPAPI类型的Flash插件并手动安装


第 4 步:从 Adobe 的网站安装 Flash Player

  1. 在计算机上打开 Chrome。
  2. 转至 https://get.adobe.com/cn/flashplayer/otherversions/
  3. 在“第 1 步”下方,选择计算机的操作系统。
  4. 在“第 2 步”下方,选择列有“PPAPI”的选项。
  5. 点击立即下载,然后按照相应步骤安装 Adobe Flash Player。

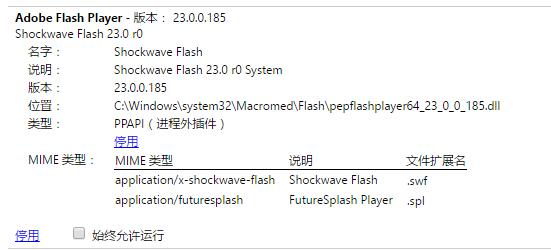
安装完成后,重启Chrome。打开chrome://plugins/,发现Chrome已经自动识别最新版本

qq%e6%88%aa%e5%9b%be20161025115813

新版本Chrome已经可以自动识别我们手动安装的插件。如果你还想把Flash文件拷贝到Chrome中(以下环境为64位系统安装64位Chrome),关闭Chrome,打开运行,输入

%appdata%\..\Local\Google\Chrome\User Data\PepperFlash

打开后,按照上图的Flash版本,新建一个文件夹,比如这里是23.0.0.185,。然后把旧的文件夹删除。将C:\Windows\System32\Macromed\Flash目录里的manifest.json 和 pepflashplayer64_23_0_0_185.dll文件复制到你新建的那个目录里面,然后把pepflashplayer64_23_0_0_185.dll重命名为pepflashplayer.dll

不过,如果你是32位系统,用的32位Chrome,就到 C:\Windows\System32\Macromed\Flash 目录下找到 manifest.json 和 pepflashplayer32_23_0_0_185.dll 这样俩文件。如果你是64位系统,用的32位Chrome,就到 C:\Windows\SysWOW64\Macromed\Flash 目录下找到 manifest.json 和 pepflashplayer32_23_0_0_185.dll 这样俩文件。不要忘记对应dll改名为pepflashplayer.dll

复制完成后你就可以卸载我们刚才安装的Flash程序了

Ubuntu 配置Node.js+Nginx+PHP+MySQL最新版本

配置环境

#有的vps需要解决php源乱码的问题
sudo apt-get install -y language-pack-en-base
vi /etc/profile
export LANG=en_US.UTF-8
export LC_ALL=en_US.UTF-8
source /etc/profile
#解决php源乱码的问题 ending

#安装add-apt-repository
apt-get install software-properties-common

#安装nodejs源
curl -sL https://deb.nodesource.com/setup_6.x | sudo -E bash -

#新版本Ubuntu16.04默认支持openssl 1.0.2h
add-apt-repository ppa:nginx/stable

#老版本Ubuntu 14.04建议使用 PPA for NGINX with HTTP/2 on Ubuntu 12.04 LTS and higher,使用下面的源可以同时升级openssl,可以开启http2
#https://launchpad.net/~ondrej/+archive/ubuntu/nginx/
add-apt-repository ppa:ondrej/nginx

#下面安装php7 mysql5.7源
add-apt-repository ppa:ondrej/php
add-apt-repository ppa:ondrej/mysql-5.7

apt-get update
apt-get install nodejs openssl nginx mysql-server php7.3 php7.3-gd php7.3-mbstring php7.3-xml php7.3-zip php7.3-curl php7.3-fpm php7.3-mysql php7.3-bcmath php7.3-dev

#查看openssl版本
openssl version

nginx.conf配置

user www-data;
worker_processes auto;
pid /run/nginx.pid;
include /etc/nginx/modules-enabled/*.conf;

events {
	worker_connections 768;
	# multi_accept on;
}

http {

	##
	# Basic Settings
	##

	sendfile on;
	tcp_nopush on;
	tcp_nodelay on;
	keepalive_timeout 65;
	types_hash_max_size 2048;
	# server_tokens off;

	# server_names_hash_bucket_size 64;
	# server_name_in_redirect off;

	include /etc/nginx/mime.types;
	default_type application/octet-stream;

	##
	# SSL Settings
	##

	ssl_protocols               TLSv1 TLSv1.1 TLSv1.2;
	ssl_ciphers                 EECDH+CHACHA20:EECDH+CHACHA20-draft:EECDH+AES128:RSA+AES128:EECDH+AES256:RSA+AES256:EECDH+3DES:RSA+3DES:!MD5;
	ssl_prefer_server_ciphers   on;

	client_max_body_size 2m;

	##
	# Logging Settings
	##

	access_log /var/log/nginx/access.log;
	error_log /var/log/nginx/error.log;

	##
	# Gzip Settings
	##

	gzip on;
	gzip_disable "msie6";
	gzip_min_length 1k;
	gzip_buffers 4 16k;
	gzip_comp_level 2;
	gzip_types text/plain application/javascript application/x-javascript text/css application/xml text/javascript application/x-httpd-php image/jpeg image/gif image/png font/ttf font/otf image/svg+xml;
	gzip_vary on;

	##
	# Virtual Host Configs
	##

	include /etc/nginx/conf.d/*.conf;
	include /etc/nginx/sites-enabled/*;
}


#mail {
#	# See sample authentication script at:
#	# http://wiki.nginx.org/ImapAuthenticateWithApachePhpScript
# 
#	# auth_http localhost/auth.php;
#	# pop3_capabilities "TOP" "USER";
#	# imap_capabilities "IMAP4rev1" "UIDPLUS";
# 
#	server {
#		listen     localhost:110;
#		protocol   pop3;
#		proxy      on;
#	}
# 
#	server {
#		listen     localhost:143;
#		protocol   imap;
#		proxy      on;
#	}
#}

默认服务器,ip返回403配置

server_tokens off;
proxy_hide_header X-Powered-By;


server {
	listen 80 default_server;
	server_name _;
	return      403;
}

server {
	listen 443 ssl http2 default_server;
	server_name _;
	ssl			on;
	ssl_certificate		/etc/letsencrypt/live/xxx/fullchain.pem;
	ssl_certificate_key	/etc/letsencrypt/live/xxx/privkey.pem;
	return 403;
}

fastcgi_params限制PHP脚本执行目录

#PHP Prohibit cross-Hosting
fastcgi_param  PHP_VALUE  "open_basedir=$document_root:/tmp/";

纯静态配置

server {
	listen		80;
	server_name	xxxx;
	root		/home/nginx/xxxx;
	index		index.html index.htm index.php;
	location ~ .*\.(gif|jpg|jpeg|png|bmp)$
	{
		expires 30d;
	}
	location ~ .*\.(woff|ttf|svg)$
	{
		expires 180d;
	}
	location ~ .*\.(js|css)?$
	{
		expires 12h;
	}
	location /
	{
 	 	 try_files $uri $uri/ =404;
	}
}

PHP一般通用配置

server {
	listen			80;
	server_name		xxxx;
	index			index.php index.html index.htm;
	root			/home/nginx/xxx;
	
	location ~ .*\.(gif|jpg|jpeg|png|bmp)$
	{
		expires 30d;
	}
	location ~ .*\.(woff|ttf|svg)$
	{
		expires 180d;
	}
	location ~ .*\.(js|css)?$
	{
		expires 12h;
	}
	location ~ \.php($|/)
	{
		try_files $uri = 404;
		fastcgi_pass unix:/run/php/php7.0-fpm.sock;
		fastcgi_index index.php;
		fastcgi_param SCRIPT_FILENAME $document_root$fastcgi_script_name;
		include fastcgi_params;
	}
}

开启fix_pathinfo(一般默认已开启)

#确认php.ini中的如下配置,其实默认已经为1,当框架出现问题时可以来检查一下
cgi.fix_pathinfo = 1

PHP通用框架配置

server {
	listen		80;
	server_name	xxxx;
	index		index.html index.htm index.php;
	root		/home/nginx/xxxx;
	
	location ~ .*\.(gif|jpg|jpeg|png|bmp|ico|webp)$
	{
		expires 30d;
	}
	location ~ .*\.(woff|ttf|svg|otf|eot)$
	{
		expires 180d;
	}
	location ~ .*\.(js|css)?$
	{
		expires 12h;
	}
	location ^~ /.svn
	{
		deny all;
	}
	location ^~ /.git
	{
		deny all;
	}
	location /
	{
		if (!-e $request_filename) { 
			rewrite ^(.*)$ /index.php/$1 last;
			break;
		}
	}
	location ~ \.php($|/)
	{
		fastcgi_split_path_info ^((?U).+.php)(/?.+)$;
		fastcgi_param PATH_INFO $fastcgi_path_info;
		fastcgi_pass unix:/run/php/php7.0-fpm.sock;
		fastcgi_param SCRIPT_FILENAME  $document_root$fastcgi_script_name;
		include	fastcgi_params;
	}
}
SSL+HTTP2的PHP框架配置

server {
	listen				443 ssl http2;
	server_name			xxx;
	index				index.html index.htm index.php;
	root				/home/nginx/xxx;

	ssl_session_cache		shared:SSL:10m;
	ssl_session_timeout		60m;

	ssl_session_tickets		on;

	ssl_certificate			/etc/letsencrypt/live/xxx/fullchain.pem;
	ssl_certificate_key		/etc/letsencrypt/live/xxx/privkey.pem;

	location ~ .*\.(gif|jpg|jpeg|png|bmp|ico|webp)$
	{
		expires 30d;
	}
	location ~ .*\.(woff|ttf|svg|otf|eot)$
	{
		expires 180d;
	}
	location ~ .*\.(js|css)?$
	{
		expires 12h;
	}
	location ^~ /.svn
	{
		deny all;
	}
	location ^~ /.git
	{
		deny all;
	}
	location /
	{
		if (!-e $request_filename) { 
			rewrite ^(.*)$ /index.php/$1 last;
			break;
		}
	}
	location ~ \.php($|/)
	{
		fastcgi_split_path_info ^((?U).+.php)(/?.+)$;
		fastcgi_param PATH_INFO $fastcgi_path_info;
		fastcgi_pass unix:/run/php/php7.0-fpm.sock;
		fastcgi_param SCRIPT_FILENAME  $document_root$fastcgi_script_name;
		include	fastcgi_params;
	}
}


Nginx的sites-available一键启动站点脚本,仿照Apache的a2ensite

在Ubuntu的Nginx发行版中,存在sites-available和sites-enable这两个目录,启用站点的方式是创建符号链接从sites-available到sites-enable,在Apache中,我们有a2ensite命令来很轻松的完成这件事情。在Nginx中没有这个脚本,所以我们可以自己编写一个。

/usr/local/sbin 中创建文件nginx_modsite,代码如下,别忘了给执行权限

#!/bin/bash

##
#  File:
#    nginx_modsite
#  Description:
#    Provides a basic script to automate enabling and disabling websites found
#    in the default configuration directories:
#      /etc/nginx/sites-available and /etc/nginx/sites-enabled
#    For easy access to this script, copy it into the directory:
#      /usr/local/sbin
#    Run this script without any arguments or with -h or --help to see a basic
#    help dialog displaying all options.
##

# Copyright (C) 2010 Michael Lustfield <[email protected]>

# Redistribution and use in source and binary forms, with or without
# modification, are permitted provided that the following conditions
# are met:
# 1. Redistributions of source code must retain the above copyright
#    notice, this list of conditions and the following disclaimer.
# 2. Redistributions in binary form must reproduce the above copyright
#    notice, this list of conditions and the following disclaimer in the
#    documentation and/or other materials provided with the distribution.
#
# THIS SOFTWARE IS PROVIDED BY AUTHOR AND CONTRIBUTORS ``AS IS'' AND
# ANY EXPRESS OR IMPLIED WARRANTIES, INCLUDING, BUT NOT LIMITED TO, THE
# IMPLIED WARRANTIES OF MERCHANTABILITY AND FITNESS FOR A PARTICULAR PURPOSE
# ARE DISCLAIMED.  IN NO EVENT SHALL AUTHOR OR CONTRIBUTORS BE LIABLE
# FOR ANY DIRECT, INDIRECT, INCIDENTAL, SPECIAL, EXEMPLARY, OR CONSEQUENTIAL
# DAMAGES (INCLUDING, BUT NOT LIMITED TO, PROCUREMENT OF SUBSTITUTE GOODS
# OR SERVICES; LOSS OF USE, DATA, OR PROFITS; OR BUSINESS INTERRUPTION)
# HOWEVER CAUSED AND ON ANY THEORY OF LIABILITY, WHETHER IN CONTRACT, STRICT
# LIABILITY, OR TORT (INCLUDING NEGLIGENCE OR OTHERWISE) ARISING IN ANY WAY
# OUT OF THE USE OF THIS SOFTWARE, EVEN IF ADVISED OF THE POSSIBILITY OF
# SUCH DAMAGE.

##
# Default Settings
##

NGINX_CONF_FILE="$(awk -F= -v RS=' ' '/conf-path/ {print $2}' <<< $(nginx -V 2>&1))"
NGINX_CONF_DIR="${NGINX_CONF_FILE%/*}"
NGINX_SITES_AVAILABLE="$NGINX_CONF_DIR/sites-available"
NGINX_SITES_ENABLED="$NGINX_CONF_DIR/sites-enabled"
SELECTED_SITE="$2"

##
# Script Functions
##

ngx_enable_site() {
    [[ ! "$SELECTED_SITE" ]] &&
        ngx_select_site "not_enabled"

    [[ ! -e "$NGINX_SITES_AVAILABLE/$SELECTED_SITE" ]] && 
        ngx_error "Site does not appear to exist."
    [[ -e "$NGINX_SITES_ENABLED/$SELECTED_SITE" ]] &&
        ngx_error "Site appears to already be enabled"

    ln -sf "$NGINX_SITES_AVAILABLE/$SELECTED_SITE" -T "$NGINX_SITES_ENABLED/$SELECTED_SITE"
    ngx_reload
}

ngx_disable_site() {
    [[ ! "$SELECTED_SITE" ]] &&
        ngx_select_site "is_enabled"

    [[ ! -e "$NGINX_SITES_AVAILABLE/$SELECTED_SITE" ]] &&
        ngx_error "Site does not appear to be \'available\'. - Not Removing"
    [[ ! -e "$NGINX_SITES_ENABLED/$SELECTED_SITE" ]] &&
        ngx_error "Site does not appear to be enabled."

    rm -f "$NGINX_SITES_ENABLED/$SELECTED_SITE"
    ngx_reload
}

ngx_list_site() {
    echo "Available sites:"
    ngx_sites "available"
    echo "Enabled Sites"
    ngx_sites "enabled"
}

##
# Helper Functions
##

ngx_select_site() {
    sites_avail=($NGINX_SITES_AVAILABLE/*)
    sa="${sites_avail[@]##*/}"
    sites_en=($NGINX_SITES_ENABLED/*)
    se="${sites_en[@]##*/}"

    case "$1" in
        not_enabled) sites=$(comm -13 <(printf "%s\n" $se) <(printf "%s\n" $sa));;
        is_enabled) sites=$(comm -12 <(printf "%s\n" $se) <(printf "%s\n" $sa));;
    esac

    ngx_prompt "$sites"
}

ngx_prompt() {
    sites=($1)
    i=0

    echo "SELECT A WEBSITE:"
    for site in ${sites[@]}; do
        echo -e "$i:\t${sites[$i]}"
        ((i++))
    done

    read -p "Enter number for website: " i
    SELECTED_SITE="${sites[$i]}"
}

ngx_sites() {
    case "$1" in
        available) dir="$NGINX_SITES_AVAILABLE";;
        enabled) dir="$NGINX_SITES_ENABLED";;
    esac

    for file in $dir/*; do
        echo -e "\t${file#*$dir/}"
    done
}

ngx_reload() {
    read -p "Would you like to reload the Nginx configuration now? (Y/n) " reload
    [[ "$reload" != "n" && "$reload" != "N" ]] && invoke-rc.d nginx reload
}

ngx_error() {
    echo -e "${0##*/}: ERROR: $1"
    [[ "$2" ]] && ngx_help
    exit 1
}

ngx_help() {
    echo "Usage: ${0##*/} [options]"
    echo "Options:"
    echo -e "\t<-e|--enable> <site>\tEnable site"
    echo -e "\t<-d|--disable> <site>\tDisable site"
    echo -e "\t<-l|--list>\t\tList sites"
    echo -e "\t<-h|--help>\t\tDisplay help"
    echo -e "\n\tIf <site> is left out a selection of options will be presented."
    echo -e "\tIt is assumed you are using the default sites-enabled and"
    echo -e "\tsites-disabled located at $NGINX_CONF_DIR."
}

##
# Core Piece
##

case "$1" in
    -e|--enable)    ngx_enable_site;;
    -d|--disable)   ngx_disable_site;;
    -l|--list)  ngx_list_site;;
    -h|--help)  ngx_help;;
    *)      ngx_error "No Options Selected" 1; ngx_help;;
esac

使用方法:

  1. 显示当前站点列表
    sudo nginx_modsite -l
  2. 启用站点test_website
    sudo nginx_modsite -e test_website
  3. 关闭站点test_website
    sudo nginx_modsite -d test_website


引用:http://serverfault.com/questions/424452/nginx-enable-site-command

现在就使用Letsencrypt,免费并被信任的SSL证书(解决Error creating new authz问题)

QQ截图20151112215616

前几天,收到了Letsencrypt发给我的测试回复邮件,告诉我我的证书申请已经通过了,就赶紧来部署一下。

1. 执行以下代码安装Letsencrypt,并准备生成证书

git clone https://github.com/letsencrypt/letsencrypt
cd letsencrypt
./letsencrypt-auto --agree-dev-preview --server https://acme-v01.api.letsencrypt.org/directory certonly

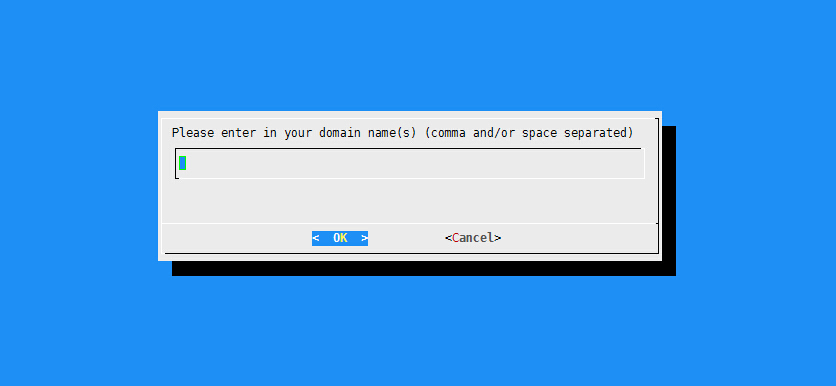
2. 然后会出现让你输入邮件和域名地址(可用逗号分开)的画面,输入就好

QQ截图20151112220110

3. Ok之后如果没问题就会出现Congratulations,并告诉你证书的位置,比如我的位置就是/etc/letsencrypt/live/onlyke.com,这里面会放相应的证书文件,在Apache或者Nginx配置好即可。

其中,在第三步如果出现如下问题

Error: serverInternal :: The server experienced an internal error :: 

QQ截图20151112220605

则可能是你的NS服务器有问题,原因在下面的页面上

https://github.com/letsencrypt/letsencrypt/wiki/Known-Issues

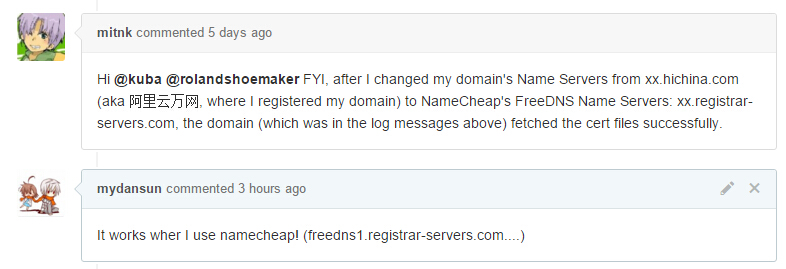
Error creating new authz (#1138, #1283): this is a problem with Boulder (boulder#1048) that happens if you request a domain that has a DNS CNAME to a subdomain of the requested domain, fix is on the way (boulder#1065). Some user solved this issue by changing domain’s Name Servers: #1369.

我的域名onlyke.com就出现了这个错误,后来我参考了https://github.com/letsencrypt/letsencrypt/issues/1369#issuecomment-154668208。把我的域名NS服务器从DNSPOD换到了Namecheap,这同样也是一家提供免费DNS解析的服务商。经过NS刷新之后,这个问题就解决了。如下图所示万网的解析应该也有这个问题。

QQ截图20151112221403


现在博客已经用上了Letsencrypt的免费SSL证书!

解决WIN10系统 VIA HD驱动无法自动切换外置音响和耳机的问题

注意:现在这个方法可能已经不适用,请在设备管理器里将声卡更新最新版本WIN10驱动!

qq%e6%88%aa%e5%9b%be20161112132139


问题表述

不想看过程的可以直接看下面的问题解决部分!

笔者电脑:神州K650C-I7D4,

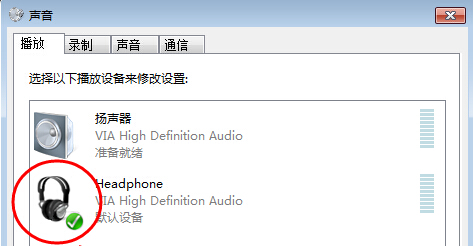
这几天新升级了WIN10,突然发现声音无法播放。查看 播放设备发现系统的默认设备变成了耳机(Headphone)类似下图

注意,因为笔者的问题已经解决。。所以只能找个WIN7里类似的图,实际上WIN10的UI肯定跟这个有区别

QQ截图20150803232119

当我们把默认设备改成扬声器后,喇叭即可出现声音。

但是问题又来了,在以前的系统WIN8.1或者WIN8,的时候,如果我们插入耳机,系统会自动把默认音频硬件切换到耳机。而在WIN10,可能是由于驱动原因,这一自动操作只能由手动完成。造成了非常严重的麻烦。

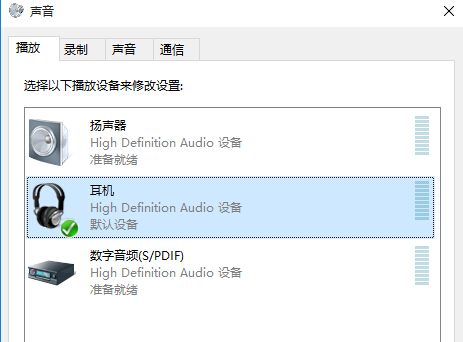
随后笔者发现,如果我们卸载VIA High Definition Audio驱动的话,也就是用微软默认的High Definition Audio。缺可以进行自动切换了。这不禁让我想起来在以前WIN7的时候也是因为VIA驱动太烂,笔者直接不装,系统默认就是High Definition Audio,如下图(也就是笔者现在正常的状态)

QQ截图20150803232537


但是在后面又发现,即使我们回退了驱动或者在当前系统卸载了VIA,一旦重新启动系统,这个倒霉的驱动又回来了,然并卵。包括当我们采取多种方式卸载驱动,这个VIA都十分的顽固,每次都重新出现在系统里。

QQ截图20150803232931

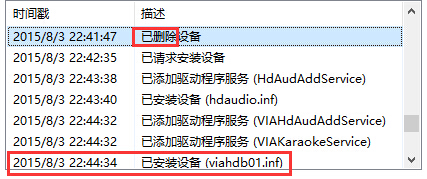
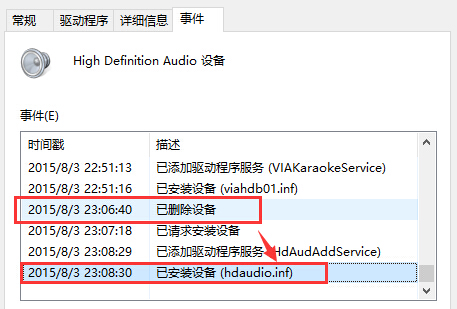
如上图,我在41分的时候删除了这个驱动然后马上重启,发现在开机的时候系统自动请求安装该驱动并且马上就装上了。。真是快啊。

所以,解决方法就是禁止系统安装这个VIA驱动

问题解决(改动系统请注意安全)

QQ截图20150803233128

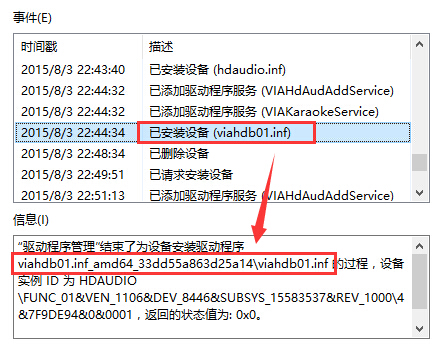
查看事件的具体信息,我们找到了这个系统自动驱动会先加载到viahdb01.inf_amd64_33dd55a863d25a14这个文件夹里,然后通过viahdb01.inf进行安装。这个目录的实体是在C:\Windows\System32\DriverStore\FileRepository里面(如果你的这个文件夹跟我不一样,但是问题跟我类似,也可以尝试解决)

QQ截图20150803233333

笔者想到的方法是删除系统对该文件夹的一切权限,包括SYSTEM。来禁止开机的时候安装这个倒霉玩意。

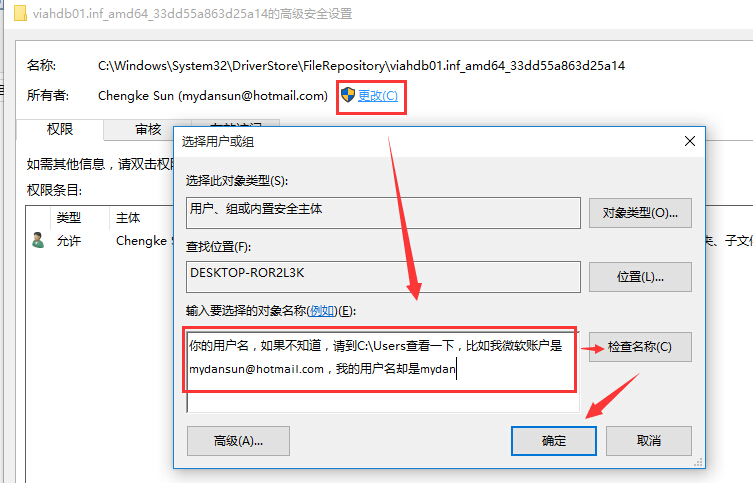
首先由于这个文件夹权限比较高,我们需要把这个文件夹的所有者由SYSTEM改成我们自己。

注意,由于笔者已经修改过,下面这个图应该现在的所有者是SYSTEM,这只是一个之后的示意图

QQ截图20150803233720

这一步完成之后,找到上一个页面左下角的禁用继承,然后会弹出一个对话框,选择一个带有删除子样的选项,这样就删掉系统其他用户的继承权限。

QQ截图20150803233948

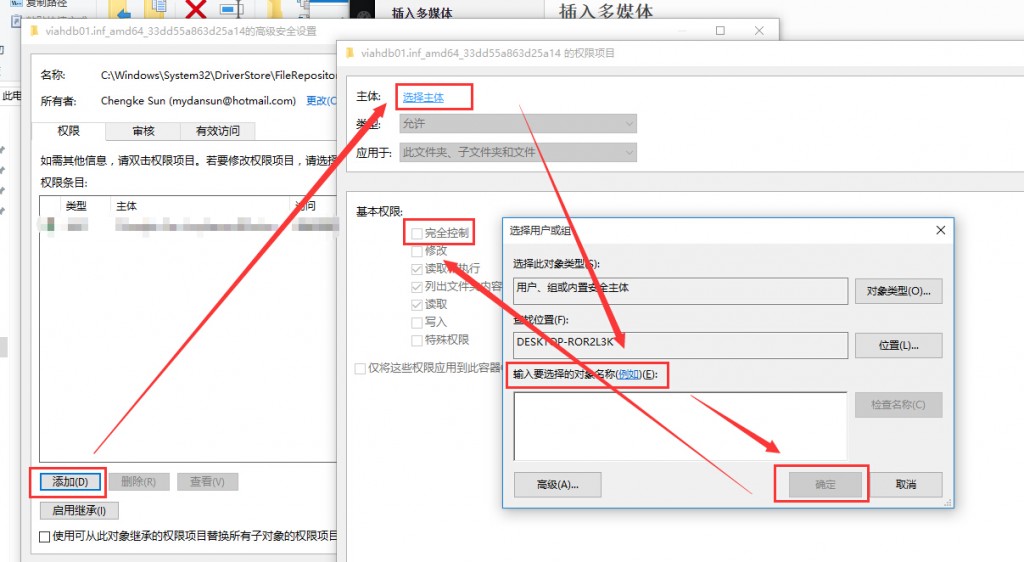
最后,别忘了点击添加,给我们自己添加“完全控制”权限

QQ截图20150803234334

现在,只有我们这个用户对这个文件夹拥有权限,所以我们可以把这个文件夹下面的文件全部删除,保持为空或者你也可以勾选只读之类的~

然后回到设备管理器,卸载VIA驱动,重启之后,系统就会为我们安装High Definition Audio,这样VIA驱动不能自动切换耳机和外放的问题也就解决了。

重启之后我们再看这个设备,发现系统重启之后为我们安装了hdaudio.inf,而不是viahdb01.inf了

QQ截图20150803234601


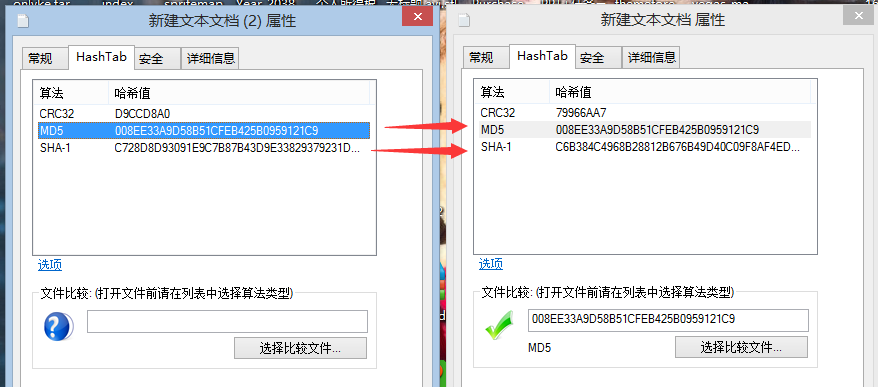
md5冲突演示

碰撞文件下载:http://pan.baidu.com/s/15Ac7W 密码: uqua

QQ图片20150725153106


下面给出两个文件的十六进制数据,请注意每个文件的后两行

文件1数据

4D C9 68 FF 0E E3 5C 20 95 72 D4 77 7B 72 15 87 
D3 6F A7 B2 1B DC 56 B7 4A 3D C0 78 3E 7B 95 18 
AF BF A2 00 A8 28 4B F3 6E 8E 4B 55 B3 5F 42 75 
93 D8 49 67 6D A0 D1 55 5D 83 60 FB 5F 07 FE A2 

文件2数据

4D C9 68 FF 0E E3 5C 20 95 72 D4 77 7B 72 15 87 
D3 6F A7 B2 1B DC 56 B7 4A 3D C0 78 3E 7B 95 18 
AF BF A2 02 A8 28 4B F3 6E 8E 4B 55 B3 5F 42 75 
93 D8 49 67 6D A0 D1 D5 5D 83 60 FB 5F 07 FE A2 

如何自己真正的分析并解决电脑蓝屏

这篇文章不是写给不愿意探究问题的小白写的。及时你之前没做过蓝屏分析,只要你仔细看这篇文章,还是可以获得收获的。

这里我就不再说什么请拔插内存,清理风扇,重装系统等解决方法了,这种东西在百度知道搜索一堆一堆的。不能说这些没有道理,不过基本上都是千篇一律且效率低下。

首先我们需要一款分析软件叫做WinDbg,是一款强大的内核态调试工具,下载地址如下:

32位(x86)版本:百度网盘

x64位版本:百度网盘

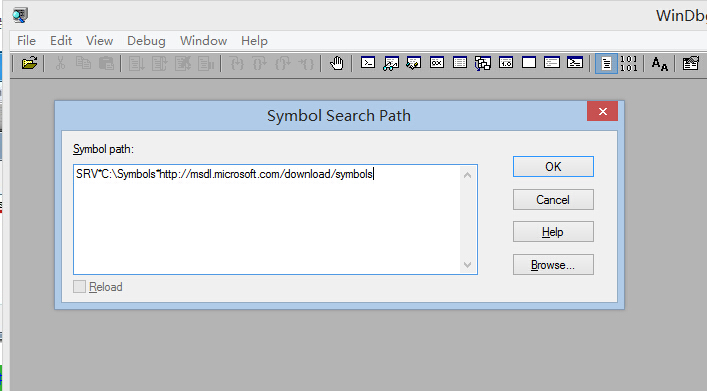
下载完成后我们运行windbg.exe,按下ctrl+s添加符号表(此步必须)

SRV*C:\Symbols*http://msdl.microsoft.com/download/symbols

QQ截图20150303095439

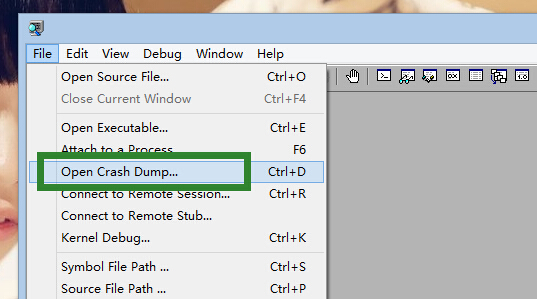
然后我们就可以打开dump文件了,这个文件请从系统目录中拷贝出来,比如win8是C:\Windows\Minidump\

QQ截图20150303095712

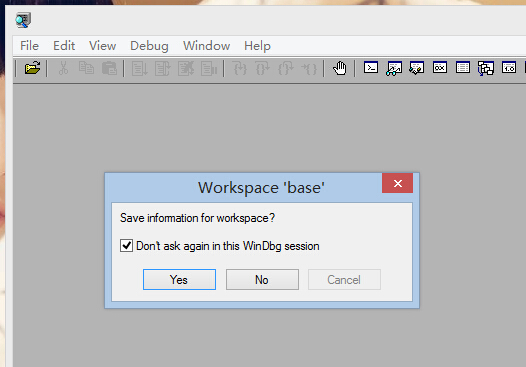
弹出的对话框请选中复选框并选择no

QQ截图20150303100018


接下来等待一段时间,日志窗口会显示Loading Kernel Symbols…

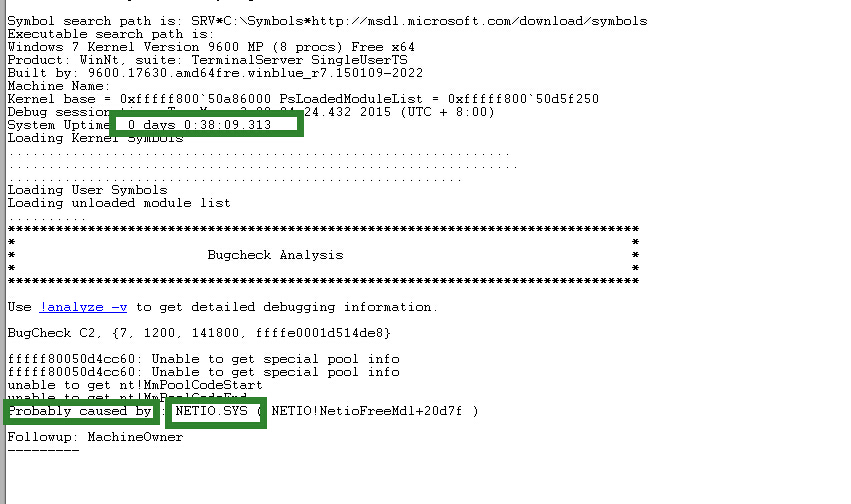
最后显示的结果类似下面

QQ截图20150303100228

System Uptime是系统运行多长时间之后发生了崩溃,而Probably caused by后面就是崩溃的原因,这里看到是NETIO.SYS,所以我们尝试了重新安装网卡的所有驱动后,问题解决。