分类目录归档:Linux

ngrok1.x 静态编译服务端/客户端amd64/macos/openwrt下载

最近搭建反代需要使用ngrok反向代理,查了很多地方都需要手动编译, 并且repo中的代码已经存在一些问题,直接编译有困难。这里提供静态编译好的版本,不需要额外依赖,平台对应代码即可运行。经过测试,ngrok性能比frp要强很多。

如果使用动态编译的版本,在缺少对应动态链接库的情况下会报下面的错误。

No such file or directory

amd64服务端(动态编译)

ngrokd: ELF 64-bit LSB executable, x86-64, version 1 (SYSV), dynamically linked, interpreter /lib64/ld-linux-x86-64.so.2, stripped

https://drive.google.com/file/d/1Ihbmb5ZLuNjjEBJpG1rG-7G0uTarf6Re/view?usp=sharing

链接: https://pan.baidu.com/s/10FgUEmnhWau08z–p1Pw5A 提取码: rp29

amd64服务端(静态编译,推荐)

ngrokd: ELF 64-bit LSB executable, x86-64, version 1 (SYSV), statically linked, stripped

https://drive.google.com/file/d/1GUWa5DUuGzk-ZohGnHDEnuz1jozfFJwA/view?usp=sharing

链接: https://pan.baidu.com/s/1rm0SSyyPT5n8kOgzh_gzfA 提取码: 9u3m

amd64客户端(动态编译)

ngrok: ELF 64-bit LSB executable, x86-64, version 1 (SYSV), dynamically linked, interpreter /lib64/ld-linux-x86-64.so.2, not stripped

https://drive.google.com/file/d/18ft5G-xUGoCXs3mhFpLUjklgpG2i0UIL/view?usp=sharing

链接: https://pan.baidu.com/s/1rEQ-1ZWBzlBjD267bgemCw 提取码: h3kf

amd64客户端(静态编译,推荐)

ngrok: ELF 64-bit LSB executable, x86-64, version 1 (SYSV), statically linked, stripped

可以放在软路由,Openwrt-amd64上

https://drive.google.com/file/d/1D6vcpDif8MPm3bG7UAt1lCDHNvozJn6n/view?usp=sharing

链接: https://pan.baidu.com/s/1yGP-c9VP7A-9ieAckG881Q 提取码: 54cg

macOS-x64客户端

ngrok: Mach-O 64-bit executable x86_64

https://drive.google.com/file/d/10IBGQIcoRLx_4LaoEigVGQISuoJXnLJH/view?usp=sharing

链接: https://pan.baidu.com/s/1KrolVlEy0CdiwSAmkb9ARA 提取码: puxh

转载:OPENWRT 使用iptables屏蔽p2p下载

编辑/etc/firewall.user,加入以下代码:

# Log会drop的包

iptables -N LOGDROP > /dev/null 2> /dev/null
iptables -F LOGDROP
iptables -A LOGDROP -j LOG --log-prefix "LOGDROP "
iptables -A LOGDROP -j DROP

# 屏蔽种子下载的关键词

iptables -I FORWARD -m string --algo bm --string "BitTorrent" -j LOGDROP
iptables -I FORWARD -m string --algo bm --string "BitTorrent protocol" -j LOGDROP
iptables -I FORWARD -m string --algo bm --string "peer_id=" -j LOGDROP
iptables -I FORWARD -m string --algo bm --string ".torrent" -j LOGDROP
iptables -I FORWARD -m string --algo bm --string "announce.php?passkey=" -j LOGDROP
iptables -I FORWARD -m string --algo bm --string "torrent" -j LOGDROP
iptables -I FORWARD -m string --algo bm --string "announce" -j LOGDROP
iptables -I FORWARD -m string --algo bm --string "info_hash" -j LOGDROP

# 屏蔽DHT网络
iptables -I FORWARD -m string --string "get_peers" --algo bm -j LOGDROP
iptables -I FORWARD -m string --string "announce_peer" --algo bm -j LOGDROP
iptables -I FORWARD -m string --string "find_node" --algo bm -j LOGDROP


# 网上找到貌似上面就够了,但是目测p2p已深入ipv6,所以可以再屏蔽一下ipv6,操作都是一样的

ip6tables -N LOGDROP > /dev/null 2> /dev/null
ip6tables -F LOGDROP
ip6tables -A LOGDROP -j LOG --log-prefix "LOGDROP "
ip6tables -A LOGDROP -j DROP
ip6tables -I FORWARD -m string --algo bm --string "BitTorrent" -j LOGDROP
ip6tables -I FORWARD -m string --algo bm --string "BitTorrent protocol" -j LOGDROP
ip6tables -I FORWARD -m string --algo bm --string "peer_id=" -j LOGDROP
ip6tables -I FORWARD -m string --algo bm --string ".torrent" -j LOGDROP
ip6tables -I FORWARD -m string --algo bm --string "announce.php?passkey=" -j LOGDROP
ip6tables -I FORWARD -m string --algo bm --string "torrent" -j LOGDROP
ip6tables -I FORWARD -m string --algo bm --string "announce" -j LOGDROP
ip6tables -I FORWARD -m string --algo bm --string "info_hash" -j LOGDROP
ip6tables -I FORWARD -m string --string "get_peers" --algo bm -j LOGDROP
ip6tables -I FORWARD -m string --string "announce_peer" --algo bm -j LOGDROP
ip6tables -I FORWARD -m string --string "find_node" --algo bm -j LOGDROP

保存之后,执行:

/etc/init.d/firewall restart

即生效。

文章转载来源:https://xintun.lofter.com/post/1dcd13e8_c8fb947

在openwrt中,使用mwan3等工具来创建虚拟wan口实现带宽叠加

首先安装我们要用的环境

opkg update
opkg install kmod-macvlan luci-app-mwan3


然后,我们在/etc/rc.local 添加如下的脚本用来生成虚拟WAN口,这里我生成了4个。注意,每一个虚拟WAN口要使用不同的名字。如果你不想给你的虚拟WAN口指定一个MAC地址,可以去掉所有的ifconfig vth1 hw ether 这一行,这样每次这个脚本运行的时候,都会生成一个新的MAC地址。

ip link add link eth0.2 name vth1 type macvlan
ifconfig vth1 hw ether 3A:33:35:52:22:3D
ifconfig vth1 up

ip link add link eth0.2 name vth2 type macvlan
ifconfig vth2 hw ether B2:7F:8A:45:ED:9E
ifconfig vth2 up

ip link add link eth0.2 name vth3 type macvlan
ifconfig vth3 hw ether EE:56:25:F1:8D:9F
ifconfig vth3 up

ip link add link eth0.2 name vth4 type macvlan
ifconfig vth4 hw ether FA:CD:E3:FC:F0:21
ifconfig vth4 up


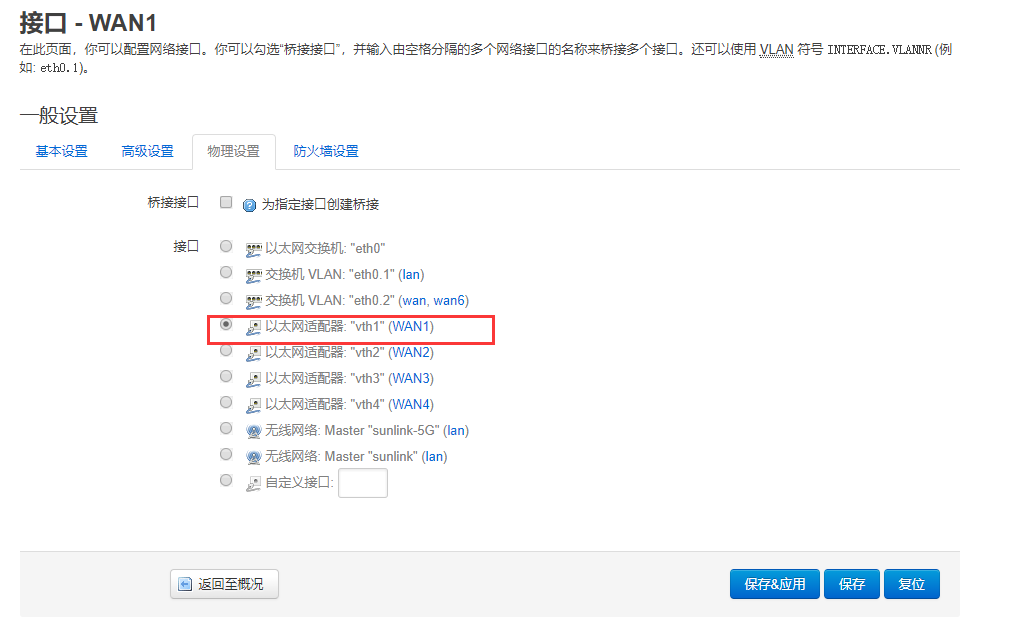
然后到网络->接口中为你刚才添加vth1-4添加接口。名字我们命名为wan1-4,这样可以对应。因为我这里是自动获取IP上网,所以协议选择是DHCP,可以根据你的需要进行变化。注意,每一个接口需要有不同的网络跃点。为了让网关认为我们是不同的电脑,也可以定义一个主机名。接口要选择正确。别忘了添加进防火墙


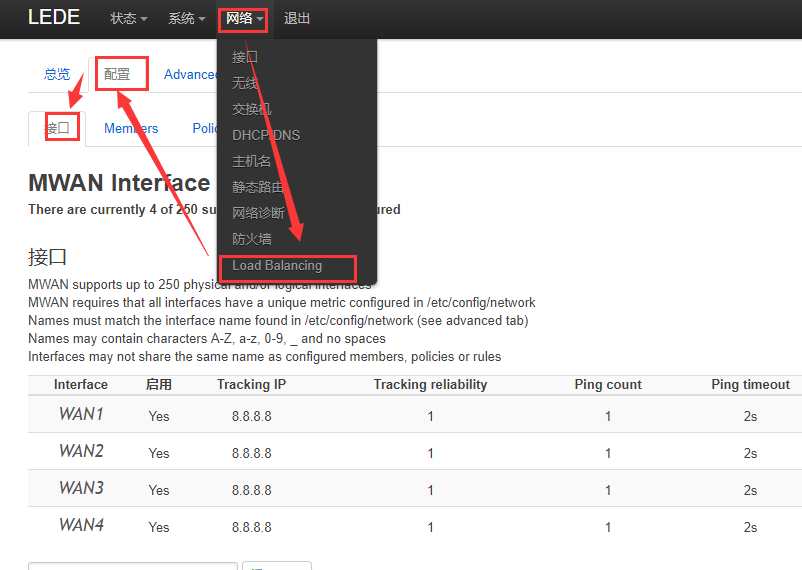
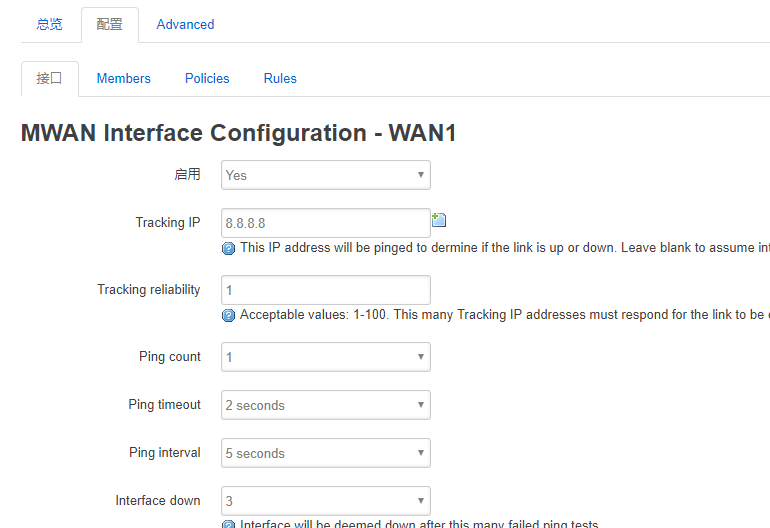
然后,我们到mwan3的设置页面。删除里面原先所有的接口。然后对应好我们之前创建好的wan1-4,在这里创建mwan的接口。Tracking IP要填写一个永远能访问的,比如8.8.8.8。


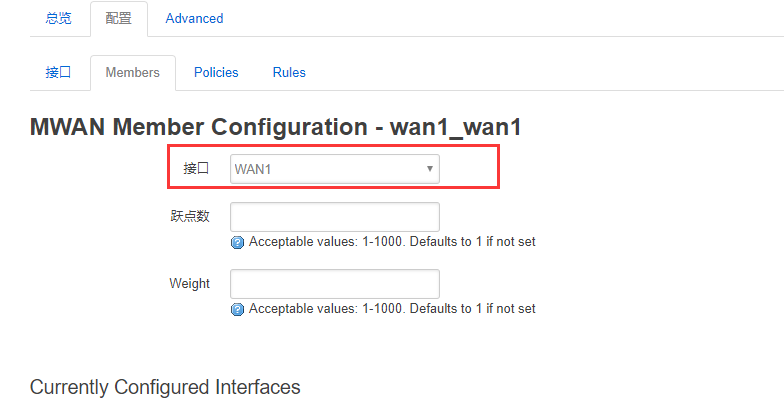
然后,到members里,删除里面所有的内容,对应我们之前创建的wan1-4,创建对应的member。接口要选对


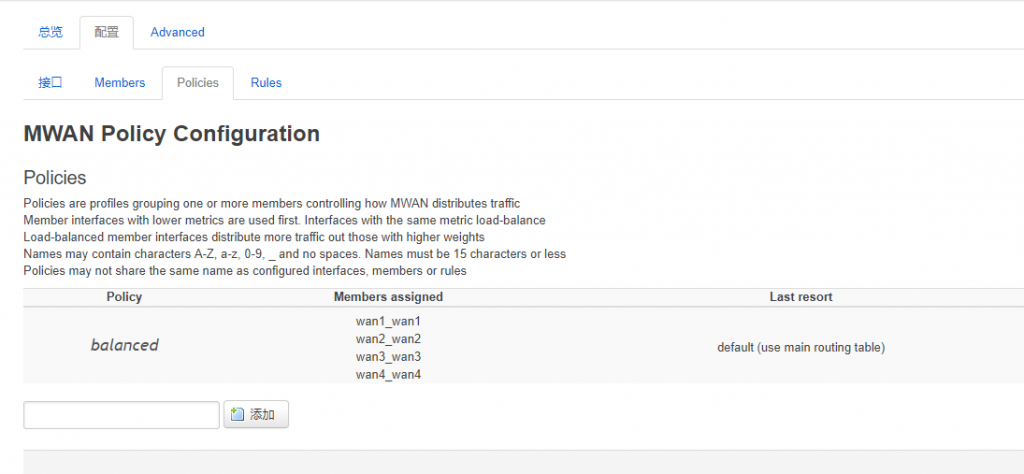
然后我们转到policies,清空里面所有的内容,创建一个名字为balanced的策略。选择上我们所有的members


最后,我们可以返回总览,看一下是否出现了4个绿色wan。出现则代表正常

如何挂载U盘到openwrt并扩容根分区

先安装必要环境

opkg update
opkg install block-mount kmod-fs-ext4 kmod-usb-ohci kmod-usb2 kmod-usb-storage e2fsprogs blkid

然后在dev中找到你的U盘(一般是sdax,这里假设为sda1)

格式化U盘

mkfs.ext4 /dev/sda1


由于我们要挂载到/,所以我们先要拷贝原来的文件到U盘中,执行下面的命令

mkdir -p /tmp/introot
mkdir -p /tmp/extroot
mount --bind / /tmp/introot
mount /dev/sda1 /tmp/extroot
tar -C /tmp/introot -cvf - . | tar -C /tmp/extroot -xf -
umount /tmp/introot
umount /tmp/extroot


然后,使用blkid 命令来查看sda1的UUID,显示结果类似于下面

/dev/mtdblock5: TYPE="squashfs"
/dev/sda1: UUID="c91d06ce-8781-4255-b635-610bd6beef7e" TYPE="ext4"


然后,把下面的UUID替换成你的,把这段文本拷贝到/etc/config/fstab 文件的后面

config 'mount'  
        option  target  '/'  
        option  uuid    'c91d06ce-8781-4255-b635-610bd6beef7e'  
        option  enabled '1'

现在,重启路由器。使用df -h 来查看是否挂载成功。如果重启失败,可以尝试取下U盘,再重启。


Ubuntu 安装VirtualBox增强功能

首先保证虚拟机已经挂在增强功能的安装盘

以下命令均需要使用root用户登录或使用sudo执行

然后安装下面的软件包

apt-get install gcc make

然后,挂载光盘

mount /dev/sr0 /media/cdrom

最后,打开目录执行安装脚本即可,安装完之后需要重新启动

cd /media/cdrom
./VBoxLinuxAdditions.run


为Ubuntu新创建用户创建默认.bashrc并自动加载

首先,su – 到新创建的用户

拷贝默认的.bashrc过来

cp /etc/skel/.bashrc ~/

然后创建.profile文件

vi ~/.profile

粘贴下面的内容

# ~/.profile: executed by Bourne-compatible login shells.

if [ "$BASH" ]; then
  if [ -f ~/.bashrc ]; then
    . ~/.bashrc
  fi
fi

mesg n

想立即生效,执行下面命令

source ~/.profile