分类目录归档:sql

更改MySQL的数据存储(datadir)目录

步骤很简单,在开始之前,不要忘了先停止mysql服务。

service mysql stop


然后,拷贝之前旧的数据文件夹到新的位置

cp -rp /data/lib/mysql /mnt

上面的命令会把/data/lib/mysql这个文件夹的所有内容(包括权限),拷贝到/mnt/mysql


然后,修改/etc/mysql/my.cnf ,如果是Ubuntu使用mysql的apt源安装的,应该修改/etc/mysql/mysql.conf.d/mysqld.cnf

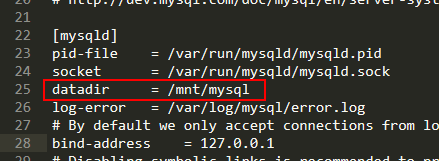
把datadir改成你需要的位置


下一步我们一般不会注意到,但是如果我们不修改这步,会造成mysql无法启动

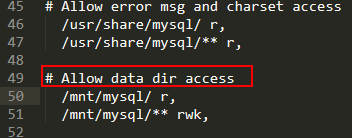
编辑/etc/apparmor.d/usr.sbin.mysqld ,找到# Allow data dir access ,把他下面的旧数据目录替换成你的新的

然后,执行下面的命令即可

/etc/init.d/apparmor restart
service mysql start


参考:http://www.jianshu.com/p/5fb55e313f8c

Ubuntu 配置Node.js+Nginx+PHP+MySQL最新版本

配置环境

#有的vps需要解决php源乱码的问题
sudo apt-get install -y language-pack-en-base
vi /etc/profile
export LANG=en_US.UTF-8
export LC_ALL=en_US.UTF-8
source /etc/profile
#解决php源乱码的问题 ending

#安装add-apt-repository
apt-get install software-properties-common

#安装nodejs源
curl -sL https://deb.nodesource.com/setup_6.x | sudo -E bash -

#新版本Ubuntu16.04默认支持openssl 1.0.2h
add-apt-repository ppa:nginx/stable

#老版本Ubuntu 14.04建议使用 PPA for NGINX with HTTP/2 on Ubuntu 12.04 LTS and higher,使用下面的源可以同时升级openssl,可以开启http2
#https://launchpad.net/~ondrej/+archive/ubuntu/nginx/
add-apt-repository ppa:ondrej/nginx

#下面安装php7 mysql5.7源
add-apt-repository ppa:ondrej/php
add-apt-repository ppa:ondrej/mysql-5.7

apt-get update
apt-get install nodejs openssl nginx mysql-server php7.3 php7.3-gd php7.3-mbstring php7.3-xml php7.3-zip php7.3-curl php7.3-fpm php7.3-mysql php7.3-bcmath php7.3-dev

#查看openssl版本
openssl version

nginx.conf配置

user www-data;
worker_processes auto;
pid /run/nginx.pid;
include /etc/nginx/modules-enabled/*.conf;

events {
	worker_connections 768;
	# multi_accept on;
}

http {

	##
	# Basic Settings
	##

	sendfile on;
	tcp_nopush on;
	tcp_nodelay on;
	keepalive_timeout 65;
	types_hash_max_size 2048;
	# server_tokens off;

	# server_names_hash_bucket_size 64;
	# server_name_in_redirect off;

	include /etc/nginx/mime.types;
	default_type application/octet-stream;

	##
	# SSL Settings
	##

	ssl_protocols               TLSv1 TLSv1.1 TLSv1.2;
	ssl_ciphers                 EECDH+CHACHA20:EECDH+CHACHA20-draft:EECDH+AES128:RSA+AES128:EECDH+AES256:RSA+AES256:EECDH+3DES:RSA+3DES:!MD5;
	ssl_prefer_server_ciphers   on;

	client_max_body_size 2m;

	##
	# Logging Settings
	##

	access_log /var/log/nginx/access.log;
	error_log /var/log/nginx/error.log;

	##
	# Gzip Settings
	##

	gzip on;
	gzip_disable "msie6";
	gzip_min_length 1k;
	gzip_buffers 4 16k;
	gzip_comp_level 2;
	gzip_types text/plain application/javascript application/x-javascript text/css application/xml text/javascript application/x-httpd-php image/jpeg image/gif image/png font/ttf font/otf image/svg+xml;
	gzip_vary on;

	##
	# Virtual Host Configs
	##

	include /etc/nginx/conf.d/*.conf;
	include /etc/nginx/sites-enabled/*;
}


#mail {
#	# See sample authentication script at:
#	# http://wiki.nginx.org/ImapAuthenticateWithApachePhpScript
# 
#	# auth_http localhost/auth.php;
#	# pop3_capabilities "TOP" "USER";
#	# imap_capabilities "IMAP4rev1" "UIDPLUS";
# 
#	server {
#		listen     localhost:110;
#		protocol   pop3;
#		proxy      on;
#	}
# 
#	server {
#		listen     localhost:143;
#		protocol   imap;
#		proxy      on;
#	}
#}

默认服务器,ip返回403配置

server_tokens off;
proxy_hide_header X-Powered-By;


server {
	listen 80 default_server;
	server_name _;
	return      403;
}

server {
	listen 443 ssl http2 default_server;
	server_name _;
	ssl			on;
	ssl_certificate		/etc/letsencrypt/live/xxx/fullchain.pem;
	ssl_certificate_key	/etc/letsencrypt/live/xxx/privkey.pem;
	return 403;
}

fastcgi_params限制PHP脚本执行目录

#PHP Prohibit cross-Hosting
fastcgi_param  PHP_VALUE  "open_basedir=$document_root:/tmp/";

纯静态配置

server {
	listen		80;
	server_name	xxxx;
	root		/home/nginx/xxxx;
	index		index.html index.htm index.php;
	location ~ .*\.(gif|jpg|jpeg|png|bmp)$
	{
		expires 30d;
	}
	location ~ .*\.(woff|ttf|svg)$
	{
		expires 180d;
	}
	location ~ .*\.(js|css)?$
	{
		expires 12h;
	}
	location /
	{
 	 	 try_files $uri $uri/ =404;
	}
}

PHP一般通用配置

server {
	listen			80;
	server_name		xxxx;
	index			index.php index.html index.htm;
	root			/home/nginx/xxx;
	
	location ~ .*\.(gif|jpg|jpeg|png|bmp)$
	{
		expires 30d;
	}
	location ~ .*\.(woff|ttf|svg)$
	{
		expires 180d;
	}
	location ~ .*\.(js|css)?$
	{
		expires 12h;
	}
	location ~ \.php($|/)
	{
		try_files $uri = 404;
		fastcgi_pass unix:/run/php/php7.0-fpm.sock;
		fastcgi_index index.php;
		fastcgi_param SCRIPT_FILENAME $document_root$fastcgi_script_name;
		include fastcgi_params;
	}
}

开启fix_pathinfo(一般默认已开启)

#确认php.ini中的如下配置,其实默认已经为1,当框架出现问题时可以来检查一下
cgi.fix_pathinfo = 1

PHP通用框架配置

server {
	listen		80;
	server_name	xxxx;
	index		index.html index.htm index.php;
	root		/home/nginx/xxxx;
	
	location ~ .*\.(gif|jpg|jpeg|png|bmp|ico|webp)$
	{
		expires 30d;
	}
	location ~ .*\.(woff|ttf|svg|otf|eot)$
	{
		expires 180d;
	}
	location ~ .*\.(js|css)?$
	{
		expires 12h;
	}
	location ^~ /.svn
	{
		deny all;
	}
	location ^~ /.git
	{
		deny all;
	}
	location /
	{
		if (!-e $request_filename) { 
			rewrite ^(.*)$ /index.php/$1 last;
			break;
		}
	}
	location ~ \.php($|/)
	{
		fastcgi_split_path_info ^((?U).+.php)(/?.+)$;
		fastcgi_param PATH_INFO $fastcgi_path_info;
		fastcgi_pass unix:/run/php/php7.0-fpm.sock;
		fastcgi_param SCRIPT_FILENAME  $document_root$fastcgi_script_name;
		include	fastcgi_params;
	}
}

SSL+HTTP2的PHP框架配置

server {
	listen				443 ssl http2;
	server_name			xxx;
	index				index.html index.htm index.php;
	root				/home/nginx/xxx;

	ssl_session_cache		shared:SSL:10m;
	ssl_session_timeout		60m;

	ssl_session_tickets		on;

	ssl_certificate			/etc/letsencrypt/live/xxx/fullchain.pem;
	ssl_certificate_key		/etc/letsencrypt/live/xxx/privkey.pem;

	location ~ .*\.(gif|jpg|jpeg|png|bmp|ico|webp)$
	{
		expires 30d;
	}
	location ~ .*\.(woff|ttf|svg|otf|eot)$
	{
		expires 180d;
	}
	location ~ .*\.(js|css)?$
	{
		expires 12h;
	}
	location ^~ /.svn
	{
		deny all;
	}
	location ^~ /.git
	{
		deny all;
	}
	location /
	{
		if (!-e $request_filename) { 
			rewrite ^(.*)$ /index.php/$1 last;
			break;
		}
	}
	location ~ \.php($|/)
	{
		fastcgi_split_path_info ^((?U).+.php)(/?.+)$;
		fastcgi_param PATH_INFO $fastcgi_path_info;
		fastcgi_pass unix:/run/php/php7.0-fpm.sock;
		fastcgi_param SCRIPT_FILENAME  $document_root$fastcgi_script_name;
		include	fastcgi_params;
	}
}


MySQL5.6.30低配机器的配置文件,最小资源占用

[mysqld]

innodb_buffer_pool_size=5M
innodb_log_buffer_size=256K
query_cache_size=0
max_connections=10
key_buffer_size=8
thread_cache_size=0
host_cache_size=0
innodb_ft_cache_size=1600000
innodb_ft_total_cache_size=32000000

# per thread or per operation settings
thread_stack=131072
sort_buffer_size=32K
read_buffer_size=8200
read_rnd_buffer_size=8200
max_heap_table_size=16K
tmp_table_size=1K
bulk_insert_buffer_size=0
join_buffer_size=128
net_buffer_length=1K
innodb_sort_buffer_size=64K

#settings that relate to the binary log (if enabled)
binlog_cache_size=4K
binlog_stmt_cache_size=4K

引用文章:http://www.tocker.ca/2014/03/10/configuring-mysql-to-use-minimal-memory.html

linux下彻底卸载mysql

停止Mysql服务

service mysqld stop

查询已安装的mysql包并删除

rpm -qa|grep -i mysql

QQ截图20160310151708

然后复制上面的包名,分别执行

rpm -e --nodeps 包名

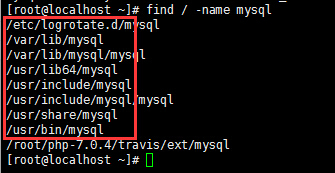
查找并删除mysql相关目录

find / -name mysql

20160310152135

把上面的目录(注意分辨一下用途),分别执行

rm -rf 目录

最后删除my.cnf

 rm -rf /etc/my.cnf


在Nginx下新建虚拟主机搭建wordpress(新手向)

搭建环境:

Nginx-1.8.0,安装目录:/usr/local/nginx

PHP-7.0,虚拟主机目录在/home/vhosts/

下载wordpress,建立虚拟主机目录

首先,我们进入虚拟主机目录,新建一个wordpress目录,下载wordpress并解压

cd /home/vhosts/
mkdir wordpress
cd wordpress
wget https://cn.wordpress.org/wordpress-4.4-zh_CN.zip
unzip wordpress-4.4-zh_CN.zip

然后我们把wordpress解压文件夹里面的文件移动到外面来,删除刚才下载的压缩包和wordpress-4.4-zh_CN.zip

mv wordpress/* ./
rm -rf wordpress*

然后我们把wordpress文件夹的权限和所有者更改一下(当前目录还为/home/vhosts/wordpress )

这里演示的是Nginxphp-fpm的用户和用户组均为nginx

chmod -R 755 ./
chown -R nginx.nginx ./

配置虚拟主机

然后,我们到Nginx的安装目录,到你虚拟主机的配置文件目录中增加一份配置(这里我新建了一个专门的目录来放虚拟主机配置文件,在/usr/local/nginx/vhosts 下)

cd /usr/local/nginx/vhosts
vi wordpress.conf

把下面的配置文件内容粘贴进去(用Windows的注意下回车和编码)

注意,其中的root目录为你wordpress虚拟主机的目录

server_name为监听的域名,这里用www.yourdomain.com做演示

server {
	listen			80;
	server_name		www.yourdomain.com;
	index			index.html index.htm index.php;
	root			/home/vhosts/wordpress;
	location ~ .*\.(gif|jpg|jpeg|png|bmp|ico|webp)$
	{
		expires 30d;
	}
	location ~ .*\.(woff|ttf|svg|otf|eot)$
	{
		expires 180d;
	}
	location ~ .*\.(js|css)?$
	{
		expires 12h;
	}
	location /
	{
		#支持wordpress的rewrite
		if (!-e $request_filename) { 
			rewrite ^(.*)$ /index.php/$1 last;
			break;
		}
	}
	location ~ \.php($|/)
	{
		fastcgi_pass 127.0.0.1:9000;
		fastcgi_index index.php;
		fastcgi_param SCRIPT_FILENAME  $document_root$fastcgi_script_name;
		include	fastcgi_params;
	}
}

接着按下Esc,输入:wq 退出vi

MySQL配置

然后我们进入mysql

mysql -u root -p

输入你的密码之后,创建wordpress数据库

create database wordpress;

接着创建一个wordpress数据库的帐号,账号名为wp,密码为123456(修改成你自己的)

grant all privileges on wordpress.* to wp@localhost identified by '123456';

完成

然后我们重载入nginx

service nginx reload

现在,访问www.yourdomain.com,用刚才创建的数据库用户名和密码安装wordpress吧
vs2012 sql server 中文乱码解决

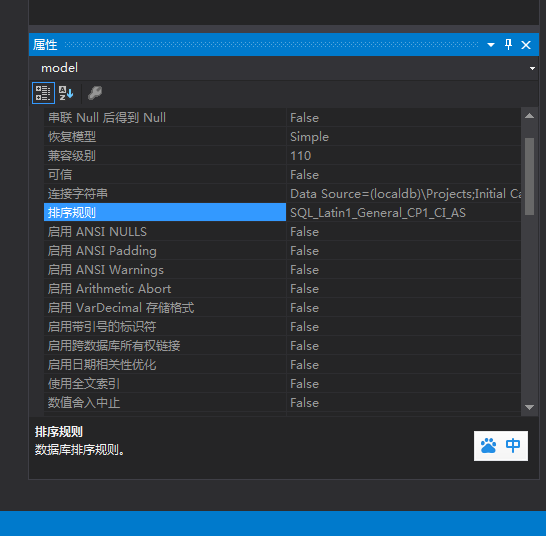
今天在上课的时候时候直接把老师发过来的sql语句在vs2012里面粘贴,结果出现了很多错误,经过检查发现新创建的数据库的排序规则并不为我们经常使用的GBK或UTF8,而老师发的sql语句中带有中文,所以造成了中文乱码,进一步造成了唯一限制错误的发生。

QQ截图20141104092300

我们只需要找到相关的数据库,执行以下sql语句即可。

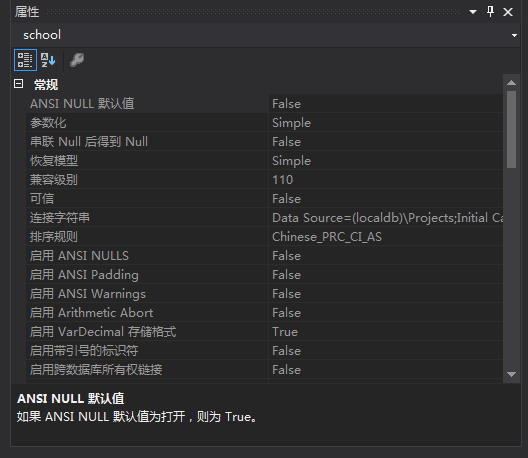
alter database 数据库名 collate Chinese_PRC_CI_AS ;
go

更改之后的效果如下

QQ截图20141104092605