分类目录归档:Openwrt

转载:OPENWRT 使用iptables屏蔽p2p下载

编辑/etc/firewall.user,加入以下代码:

# Log会drop的包

iptables -N LOGDROP > /dev/null 2> /dev/null
iptables -F LOGDROP
iptables -A LOGDROP -j LOG --log-prefix "LOGDROP "
iptables -A LOGDROP -j DROP

# 屏蔽种子下载的关键词

iptables -I FORWARD -m string --algo bm --string "BitTorrent" -j LOGDROP
iptables -I FORWARD -m string --algo bm --string "BitTorrent protocol" -j LOGDROP
iptables -I FORWARD -m string --algo bm --string "peer_id=" -j LOGDROP
iptables -I FORWARD -m string --algo bm --string ".torrent" -j LOGDROP
iptables -I FORWARD -m string --algo bm --string "announce.php?passkey=" -j LOGDROP
iptables -I FORWARD -m string --algo bm --string "torrent" -j LOGDROP
iptables -I FORWARD -m string --algo bm --string "announce" -j LOGDROP
iptables -I FORWARD -m string --algo bm --string "info_hash" -j LOGDROP

# 屏蔽DHT网络
iptables -I FORWARD -m string --string "get_peers" --algo bm -j LOGDROP
iptables -I FORWARD -m string --string "announce_peer" --algo bm -j LOGDROP
iptables -I FORWARD -m string --string "find_node" --algo bm -j LOGDROP


# 网上找到貌似上面就够了,但是目测p2p已深入ipv6,所以可以再屏蔽一下ipv6,操作都是一样的

ip6tables -N LOGDROP > /dev/null 2> /dev/null
ip6tables -F LOGDROP
ip6tables -A LOGDROP -j LOG --log-prefix "LOGDROP "
ip6tables -A LOGDROP -j DROP
ip6tables -I FORWARD -m string --algo bm --string "BitTorrent" -j LOGDROP
ip6tables -I FORWARD -m string --algo bm --string "BitTorrent protocol" -j LOGDROP
ip6tables -I FORWARD -m string --algo bm --string "peer_id=" -j LOGDROP
ip6tables -I FORWARD -m string --algo bm --string ".torrent" -j LOGDROP
ip6tables -I FORWARD -m string --algo bm --string "announce.php?passkey=" -j LOGDROP
ip6tables -I FORWARD -m string --algo bm --string "torrent" -j LOGDROP
ip6tables -I FORWARD -m string --algo bm --string "announce" -j LOGDROP
ip6tables -I FORWARD -m string --algo bm --string "info_hash" -j LOGDROP
ip6tables -I FORWARD -m string --string "get_peers" --algo bm -j LOGDROP
ip6tables -I FORWARD -m string --string "announce_peer" --algo bm -j LOGDROP
ip6tables -I FORWARD -m string --string "find_node" --algo bm -j LOGDROP

保存之后,执行:

/etc/init.d/firewall restart

即生效。

文章转载来源:https://xintun.lofter.com/post/1dcd13e8_c8fb947

在openwrt中,使用mwan3等工具来创建虚拟wan口实现带宽叠加

首先安装我们要用的环境

opkg update
opkg install kmod-macvlan luci-app-mwan3


然后,我们在/etc/rc.local 添加如下的脚本用来生成虚拟WAN口,这里我生成了4个。注意,每一个虚拟WAN口要使用不同的名字。如果你不想给你的虚拟WAN口指定一个MAC地址,可以去掉所有的ifconfig vth1 hw ether 这一行,这样每次这个脚本运行的时候,都会生成一个新的MAC地址。

ip link add link eth0.2 name vth1 type macvlan
ifconfig vth1 hw ether 3A:33:35:52:22:3D
ifconfig vth1 up

ip link add link eth0.2 name vth2 type macvlan
ifconfig vth2 hw ether B2:7F:8A:45:ED:9E
ifconfig vth2 up

ip link add link eth0.2 name vth3 type macvlan
ifconfig vth3 hw ether EE:56:25:F1:8D:9F
ifconfig vth3 up

ip link add link eth0.2 name vth4 type macvlan
ifconfig vth4 hw ether FA:CD:E3:FC:F0:21
ifconfig vth4 up


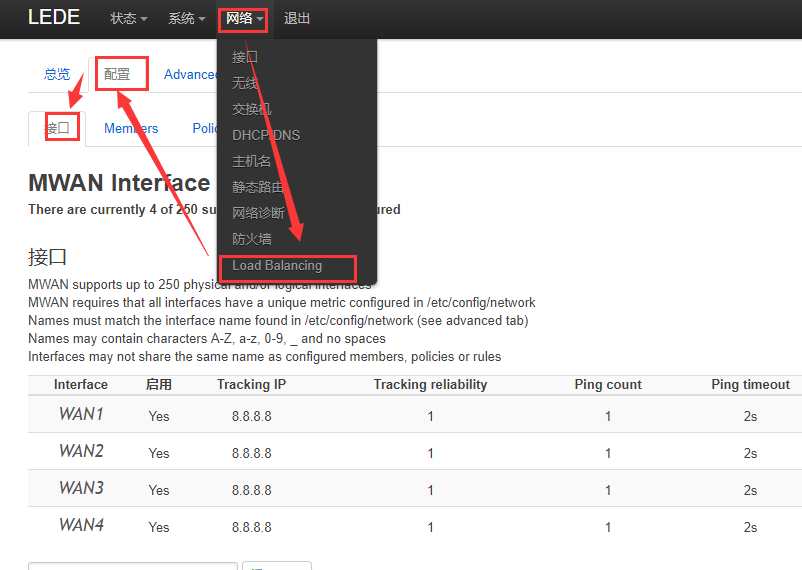
然后到网络->接口中为你刚才添加vth1-4添加接口。名字我们命名为wan1-4,这样可以对应。因为我这里是自动获取IP上网,所以协议选择是DHCP,可以根据你的需要进行变化。注意,每一个接口需要有不同的网络跃点。为了让网关认为我们是不同的电脑,也可以定义一个主机名。接口要选择正确。别忘了添加进防火墙


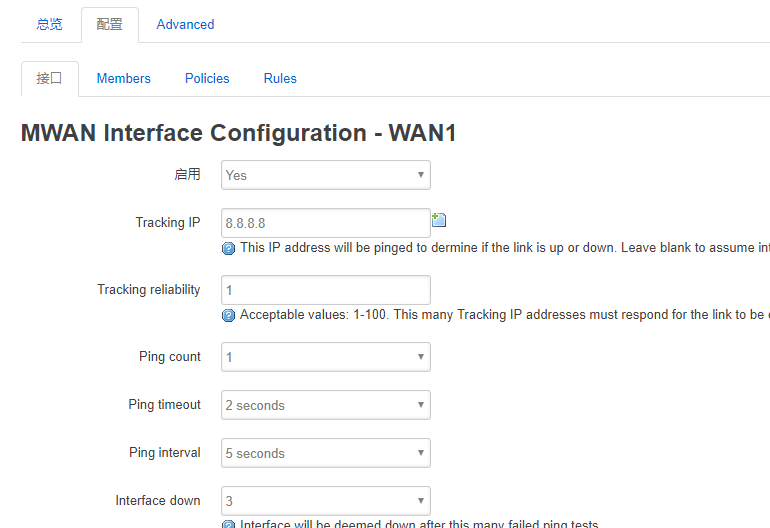
然后,我们到mwan3的设置页面。删除里面原先所有的接口。然后对应好我们之前创建好的wan1-4,在这里创建mwan的接口。Tracking IP要填写一个永远能访问的,比如8.8.8.8。


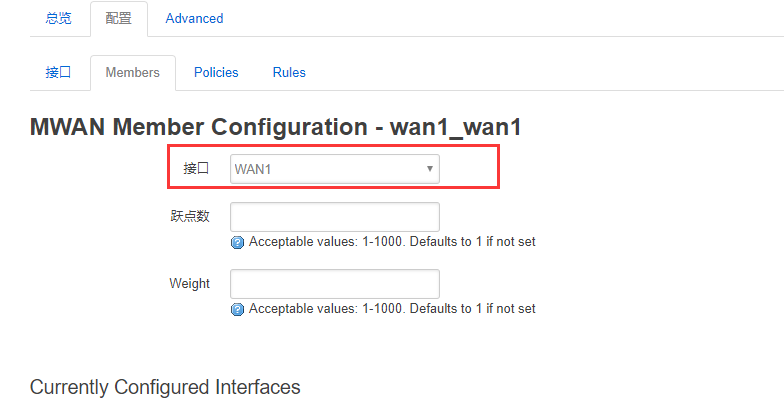
然后,到members里,删除里面所有的内容,对应我们之前创建的wan1-4,创建对应的member。接口要选对


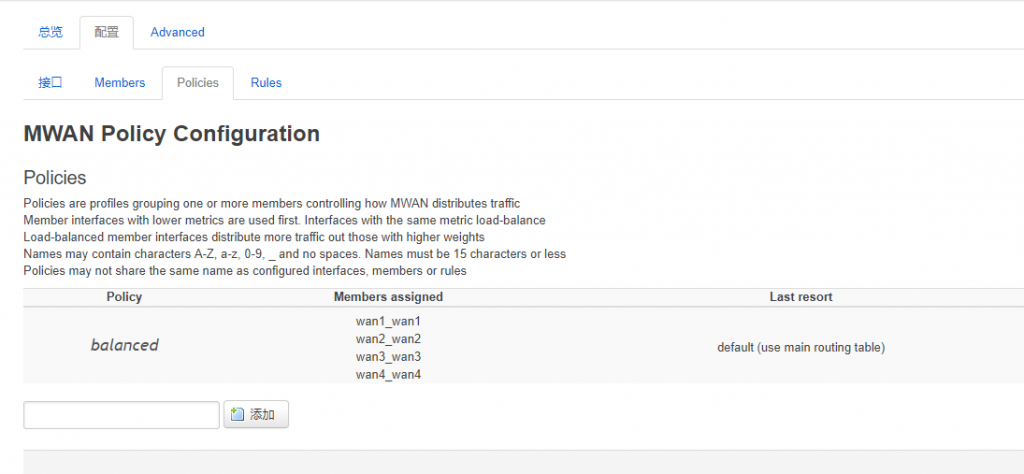
然后我们转到policies,清空里面所有的内容,创建一个名字为balanced的策略。选择上我们所有的members


最后,我们可以返回总览,看一下是否出现了4个绿色wan。出现则代表正常

如何挂载U盘到openwrt并扩容根分区

先安装必要环境

opkg update
opkg install block-mount kmod-fs-ext4 kmod-usb-ohci kmod-usb2 kmod-usb-storage e2fsprogs blkid

然后在dev中找到你的U盘(一般是sdax,这里假设为sda1)

格式化U盘

mkfs.ext4 /dev/sda1


由于我们要挂载到/,所以我们先要拷贝原来的文件到U盘中,执行下面的命令

mkdir -p /tmp/introot
mkdir -p /tmp/extroot
mount --bind / /tmp/introot
mount /dev/sda1 /tmp/extroot
tar -C /tmp/introot -cvf - . | tar -C /tmp/extroot -xf -
umount /tmp/introot
umount /tmp/extroot


然后,使用blkid 命令来查看sda1的UUID,显示结果类似于下面

/dev/mtdblock5: TYPE="squashfs"
/dev/sda1: UUID="c91d06ce-8781-4255-b635-610bd6beef7e" TYPE="ext4"


然后,把下面的UUID替换成你的,把这段文本拷贝到/etc/config/fstab 文件的后面

config 'mount'  
        option  target  '/'  
        option  uuid    'c91d06ce-8781-4255-b635-610bd6beef7e'  
        option  enabled '1'

现在,重启路由器。使用df -h 来查看是否挂载成功。如果重启失败,可以尝试取下U盘,再重启。


Openwrt局域网设备测速脚本

#!/bin/sh
echo "Collecting data..."
cat /proc/net/arp | grep : | grep ^192 | grep -v 00:00:00:00:00:00 | awk '{print $1}' > mac-ip
iptables -N UPLOAD
iptables -N DOWNLOAD
while read line;do iptables -I FORWARD 1 -s $line -j UPLOAD;done < mac-ip
while read line;do iptables -I FORWARD 1 -d $line -j DOWNLOAD;done < mac-ip
sleep 1
echo "Download speed:"
iptables -nvx -L FORWARD | grep DOWNLOAD | awk '{print $2/1024/1" KB/s ",$1/10" packets/s", $9}' | sort -n -r
echo ""
echo "Upload speed:"
iptables -nvx -L FORWARD | grep UPLOAD | awk '{print $2/1024/1" KB/s ",$1/10" packets/s", $8}' | sort -n -r
 
while read line;do iptables -D FORWARD -s $line -j UPLOAD;done < mac-ip
while read line;do iptables -D FORWARD -d $line -j DOWNLOAD;done < mac-ip
iptables -X UPLOAD
iptables -X DOWNLOAD

上面代码保存为sh文件并给予执行权限然后运行即可

Openwrt路由器使用Python自动登录北航校园网

环境配置

关于在Openwrt上安装Python可以参考这里

https://wiki.openwrt.org/doc/software/python

使用本程序请先安装Python

代码内容

在~目录下写buaa.py,内容如下

import urllib
import urllib2
import hashlib
import os
 
 
#Here input your username and password
username = 'xxx'
password = 'xxx'


def check_network():
	response = urllib2.urlopen('http://www.offer4u.cn/ping', timeout=3)
	response.close()
	return response.getcode() == 204

def login(username,password):
	md5 = hashlib.md5()
	md5.update(password)
	password = md5.hexdigest()[8:-8];
	url = 'http://gw.buaa.edu.cn/cgi-bin/do_login'
	values = {'username':username,'password':password,'drop':'0','type':'1','n':'100'}
	data = urllib.urlencode(values)
	req = urllib2.Request(url, data)
	response = urllib2.urlopen(req, timeout=3)
	page_result= response.read()
	response.close()
	if page_result.isdigit() == True:
		return "\033[1;32m%s\033[0m" % "Login successful"
	elif page_result == "password_error":
		return "\033[1;31m%s\033[0m" % "Wrong password"
	else:
		return "\033[1;31m%s\033[0m" % "Unknown error" + page_result

def light(on):
	if on == 1:
		os.system('echo 1 > /sys/class/leds/y1\:blue\:internet/brightness')
	else:
		os.system('echo 0 > /sys/class/leds/y1\:blue\:internet/brightness')
#main
try:
	if check_network() == False:
		light(0)
		result = login(username,password)
		if "successful" in result:
			light(1)
		else:
			light(0)
		print result
	else:
		light(1)
		print "\033[1;34m%s\033[0m" % "Network connection is working"
except:
	light(0)
	print "\033[1;31m%s\033[0m" % "Processing error"

代码解析

  1. 该程序运行时,首先检测网络是否连通(check_network函数),如果网络不连通则进行(login函数),然后根据登录结果输出提示或错误,并控制路由器上的一个灯来表示网络是否连通
  2. 其中http://www.offer4u.cn/ping,这个网址将在网络正常情况下返回204HTTPCODE,这个工作方式和google的类似,本来可以用google.cn的但是由于北航内部有IPV6所以会导致该网址一直处于连通状态,所以用了国内的版本。
  3. 下面这部分是一个shell脚本,用来控制我用的路由器,联想Y1上面的Internet灯的开关,网络连通时让该灯亮起(echo 1),不连通则关闭(echo 0)该灯
    echo 0 > /sys/class/leds/y1\:blue\:internet/brightness

    如果你是其他的路由器,请打开/sys/class/leds/ 目录,找到你想控制的灯,修改y1\:blue\:internet 即可(这里的反斜杠是转义符)
    QQ截图20160304003544
    这款路由器推荐一下非常不错,支持U盘并且内存和运存等配置足够支持运行和安装很多软件,并且价格便宜,我买的时候才70多

  4. 我们可以在编写完后执行python -m py_compile buaa.py ,把py编译成pyc提升性能

持续运行

  1. 在使用的过程中可能会断网,甚至比如北航会在凌晨4点准时断网,所以我们需要启用crontab来持续运行该脚本
    crontab -e

    然后我们输入

    */1 * * * * python ~/buaa.pyc > /dev/null
    */1 * * * * sleep 20; python ~/buaa.pyc > /dev/null
    */1 * * * * sleep 40; python ~/buaa.pyc > /dev/null

    这样就会每隔20秒运行我们的脚本,如果网络断开就会自动连通,其中> /dev/null 是用来关闭输出
    其中Openwrt不会默认启动crontab,我们还需要执行一下命令

    /etc/init.d/cron start
    /etc/init.d/cron enable
  2. 我们可以在连接之后手动登录北航http://gw.buaa.edu.cn/index.php,来查看是否登录成功和用户及流量状况