分类目录归档:Linux

在CentOS6.5上用rpm方法安装mysql最新版本5.7.10

首先,下载mysql-5.7.10-1.el6.x86_64.rpm-bundle.tar

wget http://dev.mysql.com/get/Downloads/MySQL-5.7/mysql-5.7.10-1.el6.x86_64.rpm-bundle.tar
tar -xvf mysql-5.7.10-1.el6.x86_64.rpm-bundle.tar

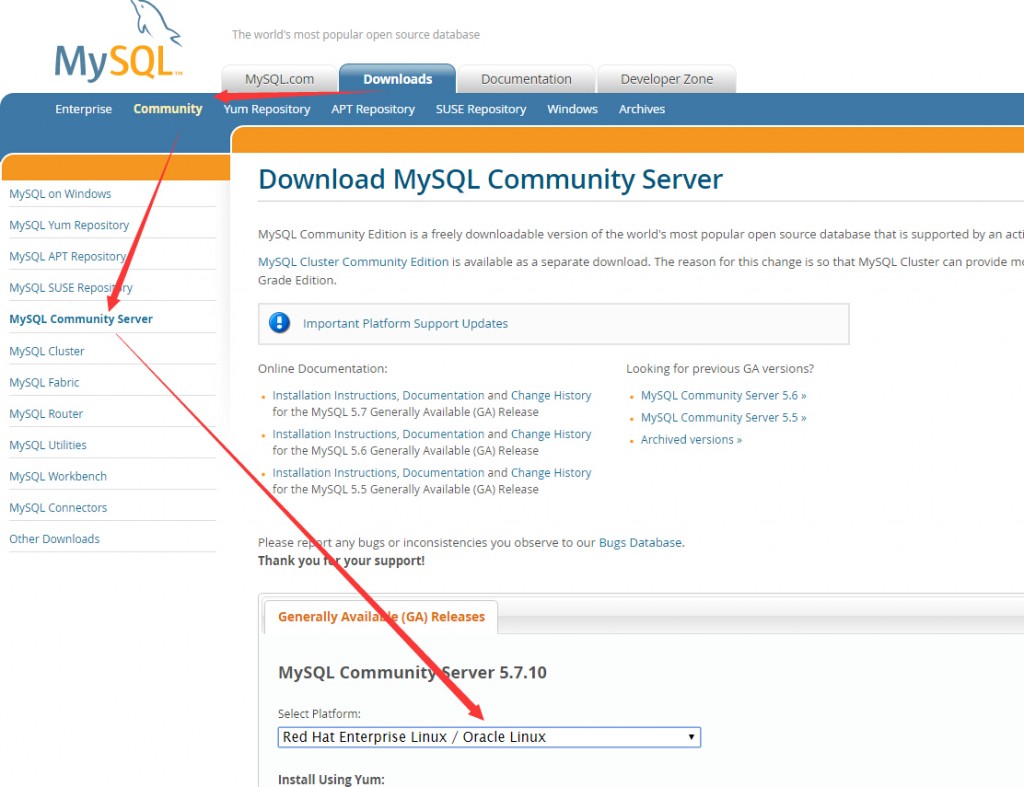
你也可以到mysql的官方网站下载:http://dev.mysql.com/downloads/

QQ截图20151216190001


安装依赖

yum install numactl

下载完了之后进入到相应目录,执行下面的命令

rpm -ivh mysql-community-common-5.7.10-1.el6.x86_64.rpm mysql-community-libs-5.7.10-1.el6.x86_64.rpm mysql-community-client-5.7.10-1.el6.x86_64.rpm mysql-community-server-5.7.10-1.el6.x86_64.rpm mysql-community-devel-5.7.10-1.el6.x86_64.rpm

然后执行下面命令初始化,执行生会在/var/log/mysqld.log生成随机密码,最后一行可以看到

mysqld --initialize

最后别忘了启动mysqld服务,更改root密码,设置开机启动和映射管道文件(php将默认使用/tmp/mysql.sock)

chown -R mysql.mysql /var/lib/mysql
service mysqld start
/usr/bin/mysqladmin -u root -p'你的初始化密码' password '你的新密码'
chkconfig mysqld on
ln -s /var/lib/mysql/mysql.sock /tmp/mysql.sock

现在就使用Letsencrypt,免费并被信任的SSL证书(解决Error creating new authz问题)

QQ截图20151112215616

前几天,收到了Letsencrypt发给我的测试回复邮件,告诉我我的证书申请已经通过了,就赶紧来部署一下。

1. 执行以下代码安装Letsencrypt,并准备生成证书

git clone https://github.com/letsencrypt/letsencrypt
cd letsencrypt
./letsencrypt-auto --agree-dev-preview --server https://acme-v01.api.letsencrypt.org/directory certonly

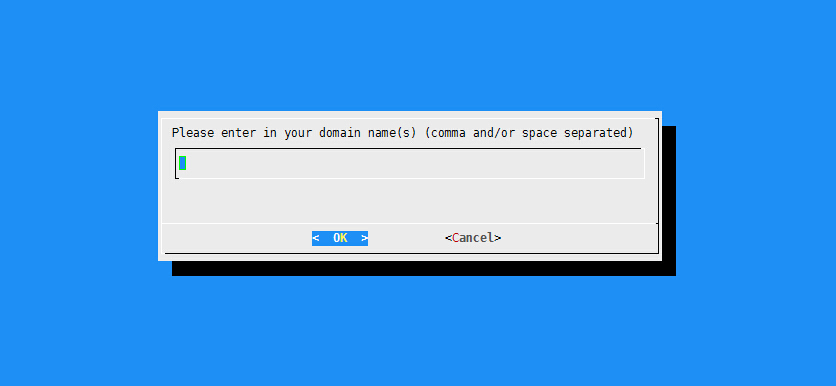
2. 然后会出现让你输入邮件和域名地址(可用逗号分开)的画面,输入就好

QQ截图20151112220110

3. Ok之后如果没问题就会出现Congratulations,并告诉你证书的位置,比如我的位置就是/etc/letsencrypt/live/onlyke.com,这里面会放相应的证书文件,在Apache或者Nginx配置好即可。

其中,在第三步如果出现如下问题

Error: serverInternal :: The server experienced an internal error :: 

QQ截图20151112220605

则可能是你的NS服务器有问题,原因在下面的页面上

https://github.com/letsencrypt/letsencrypt/wiki/Known-Issues

Error creating new authz (#1138, #1283): this is a problem with Boulder (boulder#1048) that happens if you request a domain that has a DNS CNAME to a subdomain of the requested domain, fix is on the way (boulder#1065). Some user solved this issue by changing domain’s Name Servers: #1369.

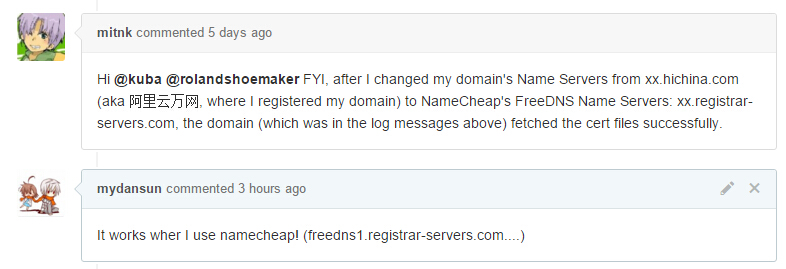
我的域名onlyke.com就出现了这个错误,后来我参考了https://github.com/letsencrypt/letsencrypt/issues/1369#issuecomment-154668208。把我的域名NS服务器从DNSPOD换到了Namecheap,这同样也是一家提供免费DNS解析的服务商。经过NS刷新之后,这个问题就解决了。如下图所示万网的解析应该也有这个问题。

QQ截图20151112221403


现在博客已经用上了Letsencrypt的免费SSL证书!

Linux配置Msmtp1.6.2和Mutt发送邮件,支持ssl

首先,安装一些需要的包
1. gcc
2. gnutls-devel或openssl-devel,这个在后面使用tls/ssl发送邮件的时候需要,ubuntu安装openssl即可

1. 下载msmtp,配置并编译(openssl也可以替换成gnutls)

#if Ubuntu
apt-get install pkg-config

wget http://nchc.dl.sourceforge.net/sourceforge/msmtp/msmtp-1.6.2.tar.xz
tar xvf msmtp-1.6.2.tar.xz
cd msmtp-1.6.2
./configure --prefix=/usr/local/msmtp --with-tls=openssl
make
make install

2. 配置msmtp
切换到相应文件夹

cd /usr/local/msmtp

新建文件夹etc

mkdir etc

使用vi新建文件

vi /usr/local/msmtp/etc/msmtprc

编辑内容如下:

# Set default values for all following accounts.
defaults
logfile /usr/local/msmtp/msmtp.log 
timeout 10
# The SMTP server of the provider. 
account test
# SMTP邮件服务器地址
host smtp.domain.163.com
# 发送的邮件Email
from [email protected]
auth login
# 邮件服务器登录账号
user [email protected]
# 邮件服务器登陆密码
password yourpassword
# Set a default account
account default: test

如果我们使用ssl方式发送,请在timeout后面加

tls on
tls_certcheck off
#使用网易邮箱必须有下面这句
tls_starttls off

3. 测试msmtp配置结果

/usr/local/msmtp/bin/msmtp [email protected]

输入任意字符,然后按Ctrl+D退出,查看邮件是否收到。

由于设置了日志,可以到 /usr/local/msmtp/msmtp.log,查看日志,发信成功失败都会有记录。

4. 安装并配置编辑mutt配置文件

#if Ubuntu 出现的选择框选择第一个保持系统默认即可
apt-get install mutt

vi ~/.muttrc

#总配置文件的位置,不推荐使用
#vi /etc/Muttrc

编辑mutt的总设置,修改以下几行

set from="发送邮件地址"
set sendmail="/usr/local/msmtp/bin/msmtp"
set use_from=yes
set realname="发件人"
set editor="vi"

发件地址最好与msmtp设置的账号相同,否则可能会出错。

5. 测试一下mutt是否有效

#echo "测试测试" | mutt -s "测试" 测试邮件地址
echo "test" |mutt -s "my_first_test" [email protected]

启动smaba后Nginx出现open() XXX failed (11: Resource temporarily unavailable)

该问题出现的症状是,当在启用smb的服务器上修改css或者js文件时,第一次刷新Nginx出现500错误,往后刷新却返回正常

查看Nginx日志发现所有资源错误为open() “资源路径 failed (11: Resource temporarily unavailable)

解决方案:请在smb的配置文件上加上,重启即可

oplocks = no
level2 oplocks = no

Nginx访问PHP文件的File not found错误处理,两种情况

这个错误很常见,原有有下面两种几种

1. php-fpm找不到SCRIPT_FILENAME里执行的php文件

2. php-fpm不能访问所执行的php,也就是权限问题

第一种情况

可以在你的location php 里面添加当文件不存在时返回404而不是交给php-fpm进行处理

location ~ \.php$
{
	...
	#文件不存在转404
	try_files	$uri = 404;
	...
}

然后,在你的配置文件中找到下面这段

fastcgi_param  SCRIPT_FILENAME  /scripts$fastcgi_script_name;

替换成下面

fastcgi_param  SCRIPT_FILENAME  $document_root$fastcgi_script_name;

然后重新加载nginx配置文件

/etc/init.d/nginx reload

第二种情况

两种解决方法:
第一种,就是把你root文件夹设为其他用户允许
第二种,找到你的php-fpm的配置文件,找到下面这段,把apache替换成你要的用户组

; RPM: apache Choosed to be able to access some dir as httpd
user = apache
; RPM: Keep a group allowed to write in log dir.
group = apache

CentOS的Nginx下安装高版本php+mysql

1. 首先安装 Remi Repository

## Install Remi & Epel Repository on RHEL/CentOS 6.4-6.0 - 32 Bit ##
rpm -Uvh http://download.fedoraproject.org/pub/epel/6/i386/epel-release-6-8.noarch.rpm
rpm -Uvh http://rpms.famillecollet.com/enterprise/remi-release-6.rpm 

## Install Remi & Epel Repository on RHEL/CentOS 6.4-6.0 - 64 Bit ## (6.5也可用)
rpm -Uvh http://download.fedoraproject.org/pub/epel/6/x86_64/epel-release-6-8.noarch.rpm
rpm -Uvh http://rpms.famillecollet.com/enterprise/remi-release-6.rpm 

## Install Remi Repository on RHEL/CentOS 5.9-5.0 - 32 Bit ##
rpm -Uvh http://dl.fedoraproject.org/pub/epel/5/i386/epel-release-5-4.noarch.rpm
rpm -Uvh http://rpms.famillecollet.com/enterprise/remi-release-5.rpm

## Install Remi Repository on RHEL/CentOS 5.9-5.0 - 64 Bit ##
rpm -Uvh http://dl.fedoraproject.org/pub/epel/5/x86_64/epel-release-5-4.noarch.rpm
rpm -Uvh http://rpms.famillecollet.com/enterprise/remi-release-5.rpm

2. 安装mysql

yum --enablerepo=remi,remi-test install mysql mysql-server

3. 配置mysql的root密码并开机启用mysql,这里密码我用123456

service mysqld start
/usr/bin/mysqladmin -u root password '123456'
chkconfig mysqld on

4. 安装php,php-fpm和php扩展

yum --enablerepo=remi,remi-test install php php-fpm php-common php-mysql php-gd php-mbstring php-xml

5. 启动php-fpm并设置为开机启动

service php-fpm start
chkconfig php-fpm on

回到你nginx的配置文件,也就是nginx.conf,如果你不是编译安装的也有可能是/etc/nginx/conf.d/的default.conf,把下面这部分的#号(注释)都去掉。

location ~ \.php$ {
    root           html;
    fastcgi_pass   127.0.0.1:9000;
    fastcgi_index  index.php;
    fastcgi_param  SCRIPT_FILENAME  /scripts$fastcgi_script_name;
    include        fastcgi_params;
}

然后重新加载nginx配置文件

/etc/init.d/nginx reload

注意:

这时如果你访问php文件出现file not found错误,请返回nginx配置文件,将下面这部分的文字

fastcgi_param  SCRIPT_FILENAME  /scripts$fastcgi_script_name;

替换成下面

fastcgi_param  SCRIPT_FILENAME  $document_root$fastcgi_script_name;

然后重新加载nginx配置文件,刷新浏览即可恢复正常

/etc/init.d/nginx reload

提示:

如果想让conf包含其他的conf,可以写追加

include /opt/nginx/conf.d/*.conf;